Today’s signals have more levels of complexity than ever before, but new scope features can solve the cause-and-effect mystery
BY JOHN HANNES
LeCroy
Chestnut Ridge, NY
http://www.lecroy.com
As digital standards are introduced, modified and updated, the digital oscilloscope continues to play a significant role in understanding their integration into a system and their behavior in a new circuit design. The latest capabilities of digital oscilloscopes augment traditional troubleshooting methods with tools that maximize insight into the design in order to reduce debug time. Investigating these tools and the oscilloscope architecture that supports them will lead to better selection criteria when choosing a digital oscilloscope.
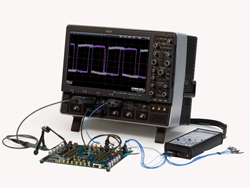
For debugging, scopes like the WavePro 700Zi with trigger scanning technology provide the fastest rare-event capture.
Specs and architectures
An oscilloscope’s analog performance and probe accessories should be selected so that the scope and probe bandwidth always measure the signal with fidelity. This is specified by the bandwidth, sample rate, and memory.
The most important consideration is the rise time of the signal. A useful and very safe rule of thumb is that the bandwidth of the scope should be greater than 0.5/risetime. Sample rates of up to 10 times the bandwidth ensure an adequate number of points per edge in order to represent the input signals from the circuit.
During power up sequences, an engineer needs to be able to see effects on all four channels as voltages are applied, onboard processors begin sequencing and other devices are powered. This requires the high sample rate and the long memory of over 100 Mpoints in today’s scopes.
Architecture and debugging
All digital scopes over 1 GHz use operating systems that integrate the scope into a Windows application environment. This provides broad connectivity to peripherals, and easy access to other programs running on the desktop. However, a scope’s performance is directly related to how the system was architected for use with long memory.
The ability to calculate measurements depends on the oscilloscope’s hardware (RAM, CPU), software (32 bit vs. 64 bit), and processing method (CPU-cache efficiency). Some scopes with over 256 Mpoints of memory are limited to what they can accomplish with longer memory. They can acquire that long-duration signal, but when asked to perform a math function they slow down and are unable to access the full oscilloscope memory. A scope using a 64-bit operating system combined with a processing methodology that reduces the number of CPU to cache operations will demonstrate an order of magnitude faster responsiveness and shorter calculation times.
Every engineer who has worked on the bench remembers a “challenge” design where a 1-in-a-billion event caused an interruption or locked up the design. Even circuits simulated and designed for the best robustness can demonstrate unforeseen behavior when the hardware arrives.
When faced with a difficult debug problem, there are three essential steps to follow: you first have to recognize the problem, then isolate it using triggering methods, and then troubleshoot to identify the cause and effect. This process leads to a fix and a completed design.
Problem isolation methods
What is causing the problem? Sometimes, with four probes connected to the clock, control signals, and a data line, the only visible evidence of a problem may be that the system hangs. By understanding the methods available today, you can make the best choice for design debug.
The simplest approach to recognizing and isolating design problems is to acquire signals on the scope and then use waveform zooms to visually look for a symptom of the problem. Specific time relations can be established from verifying read-write and setup sequences.
By scrolling through the waveform and finding suspect conditions, you can set a trigger specifically to isolate that problem event. This is a sound debug technique, but it does not take into account that while the waveforms are read out to the processor, the scope is not actively looking for the rare event.
A variation of this conventional method divides the memory into sequential blocks and improves the active “look for problem on time” significantly. Sequences of thousands of triggers, each with very low intersegment dead time, are accumulated and displayed. This improves the triggering rate performance to over 100,000 times per second, but, when the memory sequence is filled, the time to readout still dominates, lowering the chance of recognizing a problem.
Other approaches involve hardware scanning and digital-phosphor scope technologies. Trigger scanning technology provides a fast hardware based method for finding and isolating rare events in one step. In trigger scanning, several trigger configurations are loaded and then run automatically in sequence in the oscilloscope. Each configuration is set to dwell and look for the anomaly for a preset amount of time. When the rare event matches the trigger configuration, the scope triggers and updates the persistence display. Using the “always-on” nature of a hardware trigger, a vast number of configurations can be checked, thus find rare events at the fastest rate.
Every supplier has advanced trigger IC technology designed to capture glitches as small as hundreds of picoseconds wide or delta timing across channels. Until recently, an engineer had to manually adjust settings to trigger on an anomaly.
Trigger scanning provides a fast, automated, and integrated method to recognize and isolate a rare event. For example, with a 200-MHz signal with a 1-in-a-billion anomaly, an event can be found within four minutes. With trigger scanning, it is possible to integrate the automatic setup of rare-event finding into the scope.
Digital phosphor technology uses parallel processing to capture, display, and store signals in an intensity-graded display (hence “digital phosphor”) at rates as high as 400,000 times a second. This offers high scope on-time for many classes of signals and shows all signals acquired. However, as signal frequencies increase and anomalies become rarer, this method has limitations. For example, with a 200-MHz signal and 400,000 updates per second, this method sees the signal only 0.25% of the time and thustakes 40 min to find a 1-in-a-billion anomaly. As signals increase in speed and complexity, an oscilloscope technology that accumulates more anomalies per second must be chosen to recognize and isolate problems.
Tools to identify cause/effect
The final leg of the debug process is to understand the cause of the rare event and then eliminate it. All oscilloscopes over 1 GHz have feature finding algorithms that help engineers interpret what surrounds and what caused the anomaly. Feature finders scan or inspect the waveform and identify specific events. By correlating signals on different input channels, feature finders are especially helpful in the debug process’s third step — gathering insight and identifying an error’s root cause.
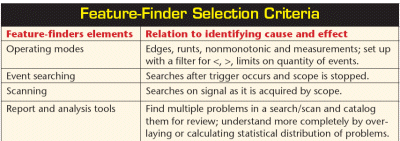
When choosing a feature finder, you can assess the strength of the tool by considering the four elements in the above table . In the most general case, a feature finder can be used both on live triggering and when a single trigger has been taken. You want to select a feature finder that can be used in the broadest of cases — while the oscilloscope is triggering; when it is stopped; and with a large event library to choose from. The last important element is how the feature finder catalogs information. Imagine a problem causing fault is found multiple times in a 50-Mpoint waveform. The oscilloscope needs to mark the signal or provide a table for rapid access. By knowing the number of rare events that occurred, you can overlay them to either visually understand their repetitive relationship or to make measurements (see Fig. 1 ).
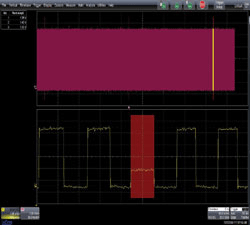
Fig. 1. The runt is shown in the yellow box and the “found feature” in the lower trace. The upper left shows a table of three features found that met this condition.
Cause-and-effect problem solving is done by getting the largest context of when the error occurs and seeing the effects on the oscilloscope’s other channels. Experienced engineers build a library of methods to link the visible effects and anomalies back to the root cause. Choosing a scope with a strong feature-finding capability speeds that learning process. ■

Advertisement
Learn more about Teledyne Lecroy


