Fundamentals of building an electric home brewery
Popular hobby is beginning to see some exciting technological upgrades
In recent years, there’s been a significant resurgence in the popularity of home breweries. Couple this trend with the ever-evolving world that is technology and what do you get? The awe-inspiring electrically based home brewery.

The electric home brewery is fast becoming a popular, new approach to the time honored hobby.
An electric home brewery benefits the user two ways: First, consider the fact that brewing beer requires a tremendous level of precision; one small error can impact an entire batch. An electric brewery eliminates a lot of the variables involved with gas-based brewing, thus providing a greater level of precision. Second is consistency. It is far easier to repeat the steps and reproduce a great batch of ale with an electric brewery.
A (very) brief summary of the beer brewing process:
Some makers claim that successful beer brewing begins with the quality of water. Then there are others who claim that their use of particular grains, hops, and mash ingredients are what separate their beer from the rest.

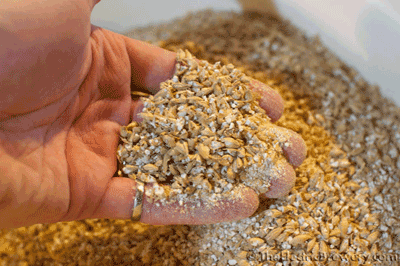
Several different types of ingredients are necessary when brewing beer.
Regardless, brewing beer is actually a pretty straightforward process, and can be summarized in these six steps:
1. Malted barley is soaked in hot water to release malt sugars.
2. Malt sugar solution is separated from the grain.
3. Malt sugar solution is boiled with hops for seasoning.
4. Solution is cooled and yeast is added to begin fermentation.
5. Yeast ferments sugar which, in turn, releases CO2 and ethyl alcohol.
6. When fermentation is complete, beer is carbonated and packaged.
Most first-time brewer mistakes are typically the result of poor processes. If you’re a first-time home brewer, you can make a quality beer simply by paying attention to the following elements: use the proper equipment and ingredients; sanitize everything, every time; and have patience.
Or, perhaps more simply: don’t take shortcuts.
Brewing beer takes time
Time spent brewing a beer largely depends upon the style you are preparing. Generally speaking, though, it can take 5 to 10 hours to finish the first four steps of the aforementioned beer-making process. After that, the yeast needs about 1-3 weeks to ferment. Once that’s done, you can keg/bottle the beer. Before you drink it, though, it’s best to leave the beer in a cool, dark spot for another 1-2 weeks to further carbonate (stronger ales are typically left to age longer).
When all is said and done, it’s about a month’s time before you can sample your first home brewed beer.
Electric breweries are the way to go

An electrically-based home brewery provides the user with a more precise control of the beer-making process.
Before we get into the differences between gas and electric, it should be stated that there is absolutely no difference between the types of beer that you can brew using either process: from Ale, IPA, and Barleywine to Lager, Wheat, and Pilsener, if you can brew it using gas, you can brew it using electricity.
Now, here are some of the advantages that this new process has over its predecessor:
• Electric home brewing is safer: there are no poisonous gases or emissions.
• The brewer has more control over temperature.
• Electricity is a more efficient use of energy.
• Electric home brewing is cheaper to run.
First-time brewery builders be warned: building an electric brewery is no small task
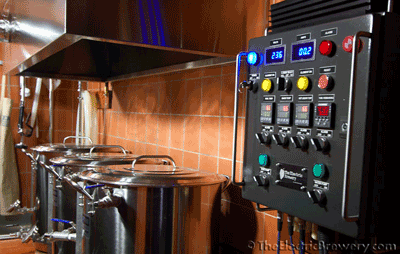
There are three main sections to an electric brewery: the control panel, electric supply, and the kettle. Everything is pretty easy to find on the Internet; the only problem is you need a TON of parts, especially when it comes to the control panel.
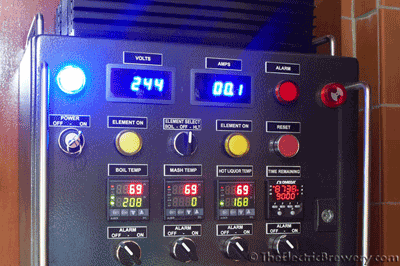
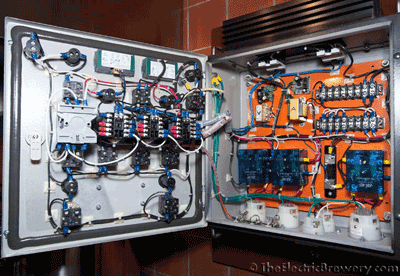
Putting the control panel in will require about three-quarters of time spent building an electric brewery. That’s because it sits at the center of the whole brewing process: it plugs into your electric supply, controls the heating elements, and monitors the various temperatures. The rest of the brewery is just tanks, hoses, pumps, and setting the kettles up. (Okay, maybe it’s not that straightforward, but it’s pretty close.) With the control panel, you need to figure out placement of lights, switches, meters, handles, relays, wires, etc.

The control panel requires the most effort when building an electric home brewery.
There are two ways that you can tackle the control panel portion of this project: you can order it pre-fabricated and pre-tested, or you can build the control panel yourself. Details on how to do this vary depending upon the size of the electric brewery you’re setting up, but there are sites out there like TheElectricBrewery.com that are an excellent resource for the electric brewery builder to reference.
Tips for the aspiring beer brewer
Are you considering setting up a (hopefully electric) home brewery? Here are some important tips to keep in mind as you take on this fun hobby:
• Always clean and sanitize your work area : a very effective solution for doing this is liquid chlorine bleach.
• Make sure all of your parts are functioning properly : a malfunctioning thermometer, for example, can have an unfavorable impact on the quality of your homebrew.
• If you’re not kegging the beer then before you start, try to collect at least 50+ non-screw-top bottles : never use a twist-off bottle — they’re too thin and the caps will not seal the beer properly. Gather the thickest bottles you can find and clean them thoroughly. Also, keep in mind that darker bottles are better (they prevent light from getting in and aging your beer).
• Keep temperatures at the low-end of the recommended range : this will result in a cleaner, better tasting beer. Keeping it cooler allows the yeast to go dormant; if it gets too warm, you’ll get some unusual “fruity” flavors. Ideal temperature varies depending on strain of yeast used, but a good rule of thumb for beginners is to try to keep the temperature between 60 and 70°F for Ales, or 45° to 55°F for Lagers.
Special thanks to Kal Wallner of TheElectricBrewery.com for the images used in this article. ■
Advertisement
Learn more about Electronic Products Magazine


