Fact: people are willing pay ridiculous amounts of money for unique and seemingly odd objects, objects such as vintage suitcase boom boxes. Yes, stereos built into vintage suitcases range between $800 and $2000, and are an excellent accessory to compliment your retro furniture or classic car. Alternatively, opting to build your own suitcase stereo will costs a quarter of the price and it later can be resold for huge profits. Maxim Integrated’s Patrick Gallagher tutorial teaches us the critical steps needed to ensure the sound comes through with as much fidelity as possible.
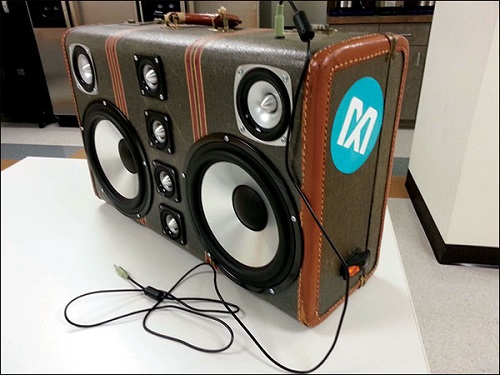
The suitcase
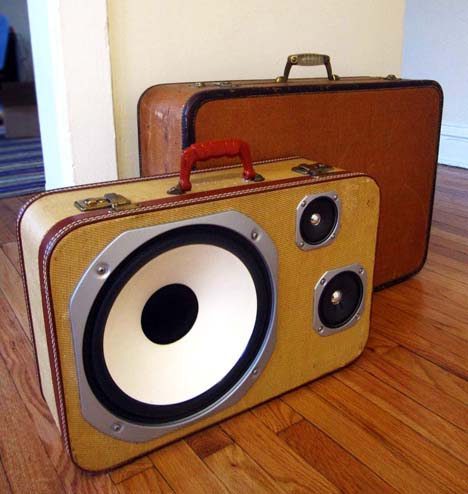
Since this type of stereo heavily emphasizes aesthetics, its highly recommended that you take some time to scour through eBay.com and etsy.com to find the perfect suitcase that tickles your fancy. Local thrift shops are also valid sources; however, online tend to carry a larger selection that your local brick and mortar shops.
The electronics
Patrick used the MAX98400A and MAX98400AEVKIT for his suitcase boom box, but you may select your favorite Class D amplifier and evaluation kit. Class D amps are the best bang for your buck as they are highly efficient; output transistors are either fully turned on or off during operation, completely eliminating the need to use the linear region of the transistors.
Filtering the output of the Class D amp isn’t actually necessary, because one of the two amps on the EV kit has an on-board, passive Class D filter making the speaker act as the filter. The second amp on the EV is specified for filter-less evaluation.
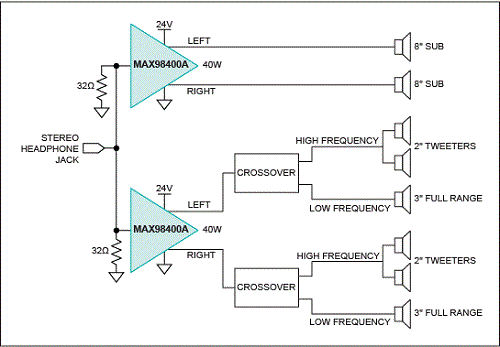
One amp goes through a crossover to power a 3 inch full-range speaker and two 2inch tweeters. The second amp exclusively powers the big 8 inch drivers.
At this point you may either go with a bi-amp design to drive eight speakers, the way Patrick did, or build a 2.1 system with one amp outputting stereo while the other drives all of its power into a single woofer. In Patrick’s design, one stereo amp powers two woofers while the other moves from a crossover to a midrange driver with two tweeters per channel.
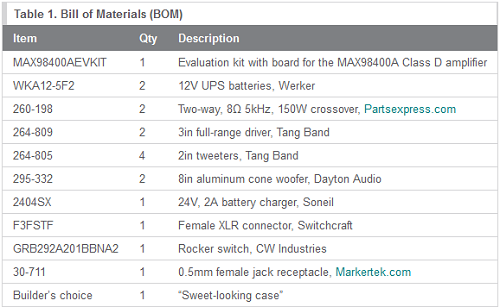
The total required materials include the following:
Audio setup
Draw a speaker layout and select the appropriate drivers based on your intended template. Take into consideration how their size and shape impacts the final design. Depending on the durability of the suitcase, a plywood or acrylic glass support wall may need to be installed in place of the suitcase’s inner lining to reinforce the sidewall and support the weight of the speakers.
Once you’ve cut the holes needed to install the speakers, select the passive crossover that’s most optimal for the speakers’ frequency response. If you are following Patrick’s design scheme, you may lowpass filter the woofers for a more balanced sound or skip this all together if loudness is your goal.
Next, connect the speakers and crossovers to the EV kit using 12-gauge speaker wire and banana jacks. Afterwards, glue the crossovers to the suitcase walls, solder wires to the pins of the headphone jack connector, heat shrink the solder joints, and repeat this process for the terminals of the power switch.
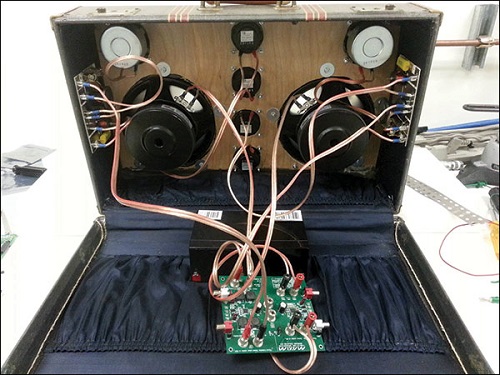
Powering the device
Both amps have an absolute maximum supply voltage of 28V, with 24V within the operating range, so select an appropriate battery. Do not be afraid to choose a heavy energy dense battery, as the suitcase was made to carry weight in the first place. Patrick’s design uses two UPS, lead-acid batteries, which are positioned to counter balance the weight of the speakers is ideal. Consider placing them in the back side of the suitcase and building a holster to keep them in place. Patrick accomplished this with pipe straps secured to a plywood base.
By this point we’re almost finished, yet having batteries is pointless if they are not connected to a battery charger. Affix a 24V battery charger and an on/off switch with an indicator LED using an XLR port attached to the side of the battery module. Afterwards, proceed to stuff the suitcase with polyfill stuffing to reduce rattling and sharpen the sound as well as deepen the base.
Calibrating the 3.5mm jack with smartphones
The reason for selecting a 3.5mm jack is obvious: smartphone integration. What’s a boombox if not a portable music machine, and what storage mode is portable than a smartphone? Nevertheless, a small tweak must be made to enable your smartphone to detect that 3.5mm jack in the first place.
Smartphones detect when headphones are plugged in using a jack-detection circuit that checks for impedance. If we do not add a 32Ω resistor to ground at the amplifier’s input to the amplifier, then the audio will be extremely low. This technique actually tricks the phone into acting as if it’s powering headphones to produce a stronger signal level.
By this point in the tutorial your vintage suitcase boom box will be complete, making you the life of whatever hipster party you attend. Now if you’re still ambitious and want to crank it to the next level, consider adding Bluetooth connectivity in place of the headphone jack, making it true portable experience.
Visit Maxim Integrated for a complete part listing
Related Products: Audio Components
Advertisement
Learn more about Electronic Products Magazine


