While most consumers are beginning to take to the idea of storing files on a cloud server, the USB drive industry is not suffering. The portable storage device remains one of the more popular methods for saving and transporting files, both for its simplicity as well as its ease of transportation.
The one headache that fans of USB drives face with the device is how quickly it fills up with data and files. While it’s a common problem, it’s actually a pretty quick fix. Here’s how you can adjust your USB drive to free up space on it in less than five minutes.
To begin, everything is done using Windows’ built-in tools to compress the data on the device. This isn’t the biggest deal since Windows OS is so commonplace, you can do it on a PC or a friend or family member’s computer instead.
One other caveat — you will be re-formatting the USB drive. So, if you have files on the device, put them somewhere else while you work on the drive (on the cloud, another USB device, etc.)
Okay, so now that you have a Windows computer and a file-free thumb drive, here’s how to free up space on the device: plug the stick into the computer and locate the drive in Windows File Explorer – right click on the drive’s name, select format, and confirm that “NTFS” is selected as the file system (they’re typically set to “FAT” instead). Set the allocation size to “default allocation size”. Next, click “quick format” and then click “start”.
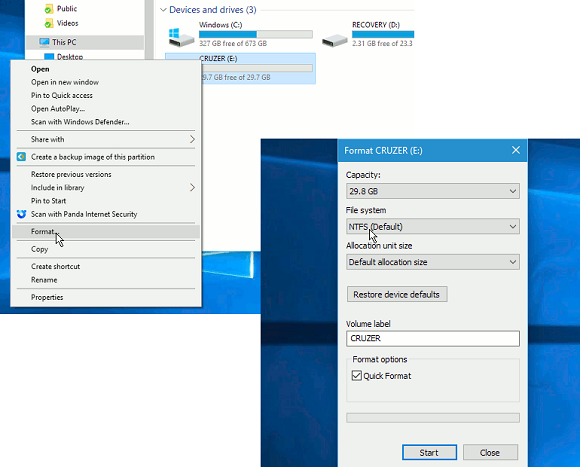
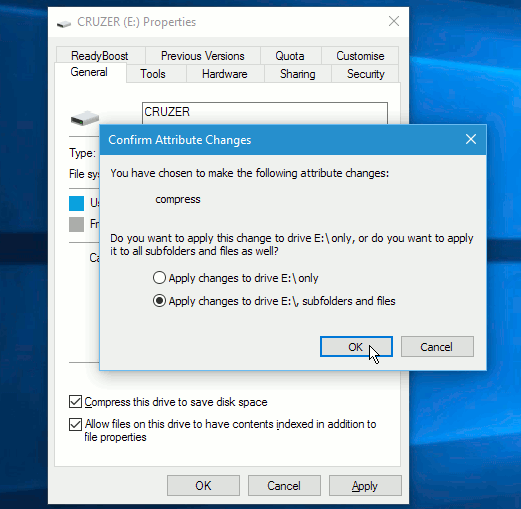
When this part of the formatting process is completed, right-click the USB drive again and select “properties”. When the dialogue box pops up, click “compress this drive to save disk space”, then click “apply” to confirm that this decision covers all subfolders and files.
Believe it or not, that’s it — your drive is now compressed. Space saved will be most noticeable when you drop regular files back on to the drive, but do note that it won’t be as noticeable with file types that already use a form of compression technique — things like zip files and JPEG images.
So, what exactly did you just do? Basically, you told Windows to compress any file that is copied to or otherwise saved to the thumb drive. They’re not being zipped — Windows is simply queued up to automatically perform compression and decompression duties in the background whenever the thumb drive is being used. On the front, everything appears normal to the user (maybe with an ever-so-slight delay).
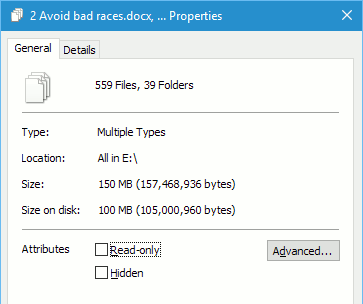
To see how much space is gained, copy your files back over to the thumb drive, press CTRL+A to select all files, right click them, and then select properties. This will tell you the size of the files when decompressed, and you can compare that to the size that the thumb drive has to offer. Some tests of this procedure have revealed 150MB being stored to a 100MB thumb drive.
Worth noting — this compression technique works for any folder on a Windows system (not just thumb drives), though it does come at the expense of a few CPU cycles. Also, don’t apply it to the computer’s entire hard drive, as the system will really begin to lag.
The technique also increases the number of writes required, so it’s better to use it for files that are being archived and accessed on occasion.
Via RAW Computing
Advertisement
Learn more about Electronic Products Magazine


