It’s quite easy to shoot a high-quality, high-resolution video on your smartphone, DSLR camera, or GoPro these days. But that file size can grow pretty quickly, causing your memory card to max out or making it difficult to upload to the Internet.
Luckily, it’s relatively easy to reduce video file sizes. However, unless you change the right settings, you will lose the video quality. Here’s how to reduce size without compromising quality:
Pick the correct software
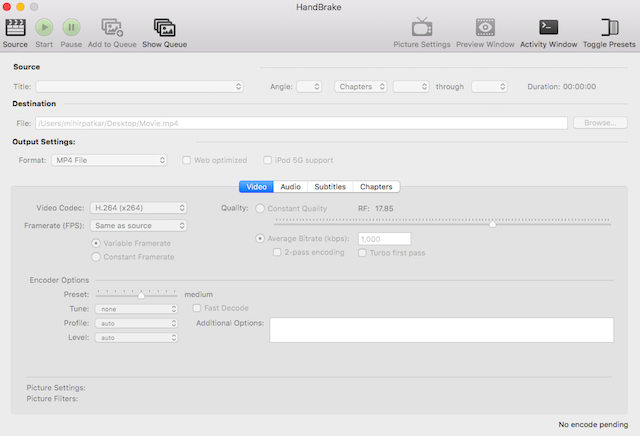
For this task, it’s ideal to use a computer, not a tablet or a smartphone. Handbrake is the most useful and powerful cross-platform media converter out there. The tool is completely free and works the same on Windows, Mac, and Linux.

For those using Windows, there is also the Freemake Video Converter, which has an even easier interface. Do note that the Handbrake does a better job of encoding and converting videos.
Begin with the audio
Start by heading over to the “Audio” tab in Handbrake; you may be surprised by how much space audio channels take up. For any video where human speech is important, or music isn’t a priority, follow these steps:

Check to see if there is more than one audio track. You’ll need just one. If it’s a movie, look for the “English” audio or whatever language you prefer. If it’s a video you made, the first track will probably be the correct one. Delete all other tracks.
In Codec, choose AAC (CoreAudio) or MP3. These are lossy compressed audio file formats that are sufficient enough for most cases. Even for concerts or other similar videos, you can choose one of these lossy formats and sample it at a higher bitrate.
In Bitrate, select 160 by default for most videos. If you’re converting video where music is the primary element, choose a higher bitrate (256 or 320).
Choose the best Codec and Container
The video should be shot using the highest quality video codec and container. To reduce the size, you pick the most efficient codec and container.
The codec is the encoder/decoder that turns the video into bytes, whereas the container is the file format that determines compatibility with different devices and services.

Choose H.264 as the codec. This is the most efficient and popular codec for high-definition videos and is almost twice as good as MPEG-4 for compressing videos.

Choose MP4 as the container. MP4 is also capable, but more importantly, it is the most widely recognized file format for videos. YouTube, Vimeo, and Facebook all recommend MP4 as the preferred container.
Reduce the video resolution
While it’s awesome that your phone can shoot 4K videos, make sure you have a 4K-ready TV or monitor to play it on. Resolution affects the size of the video tremendously, but the quality may not be so significantly affected. How far you sit away from the screen, the technology of the TV, and the bitrate of the video are going to have more of an impact.
These are the commonly used resolutions:
- 2160p (3840×2160)
- 1440p (2560×1440)
- 1080p (1920×1080)
- 720p (1280×720)
- 480p (854×480)
- 360p (640×360)
- 240p (426×240)
To reduce file size by resolution, check the video’s original resolution and choose one level below it. In handbrake, this is found in the “Picture Settings” located in the top-right menu. It even allows you to check out a Preview of the lowered resolution before you commit to it.
If you plan to simply upload your video to Facebook or YouTube, 720p is the best resolution. Facebook caps the resolution at 720p, but YouTube lets you go higher to 4K.
Use bitrate as the last resort
The largest factor in determining the quality of a video is its bitrate, which is why it should be the last resort. Bitrate is the amount of data being shown in one second. The more data you allow, the more artifacts can be displayed on the screen, thus producing a better quality video.

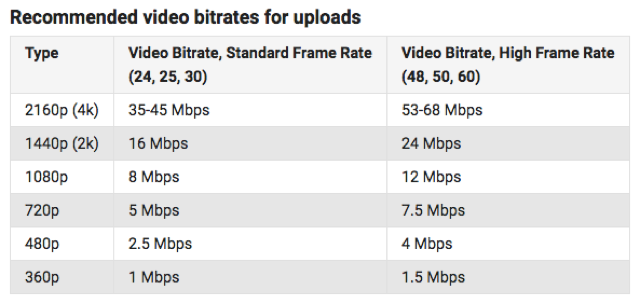
Many DSLRs record video at high bitrates, as do most screen recording and screencasting software. YouTube has recommended bitrates that you can use as a rule of thumb for any video file. Do not go below these recommended numbers, but if your current bitrate is higher, you can reduce it.

It is recommended that you keep your bitrate variable rather than constant. In Handbrake, go to Video > Quality > Average Bitrate, and make sure to key in a number that best corresponds to your video’s resolution.
Do not change frame rates
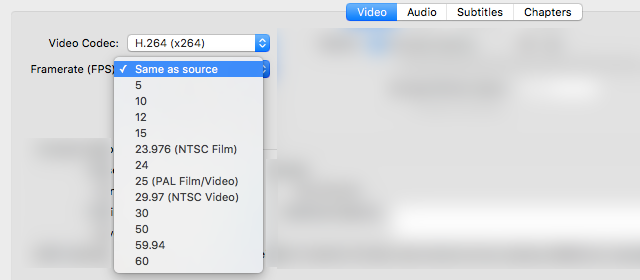
Video experts, video hosting sites, and video editors collectively say you should keep your video at the same frame rate that it was recorded in.

The human eye needs only 24-30 frames per second (FPS) for a sufficient picture, so you may reduce the frame rate to that range. However, lowering it may affect the smoothness of the video, making the movement seem jerky or unnatural.
What useful tricks do you use to cut the size of your video without affecting its quality?
Source: MakeUseOf
Advertisement
Learn more about Electronic Products Magazine


