By Heather Hamilton, contributing writer, and Max Teodorescu, content editor
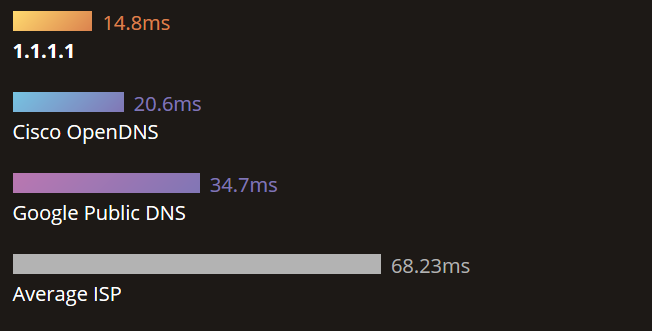
April Fools’ Day commemorates the launch of Cloudflare’s own consumer DNS service, a very real and free DNS service designed by a company that views the buying and selling of personal data as toxic. According to Cloudflare, it is the fastest, most private DNS service available, surpassing both OpenDNS and GoogleDNS. Unlike its competitors, Cloudflare’s option wipes all logs of DNS queries within 24 hours.
Computers on the internet communicate with each other using strings of digits called Internet Protocol, or IP addresses, which essentially function like a website’s home address, but memorizing strings of digits is far less intuitive than using words and language. This is where DNS services come in. DNS services are a staple of the internet’s infrastructure, translating numeric IP addresses into letters. That way, users can navigate the internet with domain names like “Google.com” instead of “172.217.10.46.”
Default DNS services aren’t optimized for speed because internet service providers and wireless networks keep logs of all the sites that you’ve visited, regardless of whether your content is encrypted. Many even sell this data to advertisers to build custom profiles that allow for targeted personalized ads. According to Cloudflare’s announcement, “By default, your ISP, every Wi-Fi network you’ve connected to, and your mobile network provider have a list of every site you’ve visited while using them.” The concern goes beyond U.S. borders; nearly all ISPs around the world take advantage of the same data collection opportunity.
In order to establish a memorable foothold, Cloudflare sought a memorable IP address. The organization had its eye on 1.1.1.1, which is held by APNIC, the Regional Internet Registry (RIR) responsible for allocating IPs in the Asia Pacific region. The two organizations entered into an agreement wherein APNIC would allow Cloudflare use of its 1.1.1.1. IP address in exchange for the right to study the “flood of garbage traffic” that resulted from people previously entering the address into “various random systems,” writes Cloudflare in a blog announcing the release of 1.1.1.1.
Why would you want to use Cloudflare’s DNS service?
According to tests conducted by DNSPerf, Cloudflare’s service outperformed even Google’s own DNS resolver (8.8.8.8) and holds the title of the fastest DNS service in the world. The service is free to use and deletes logs after 24 hours, the minimum time frame necessary to prevent abuse and debug issues. What’s not to pass up about speed and privacy?

The DNS offers support for DNS-over-TLS and DNS-over-HTTPS and has a response time of 14 ms, which is much faster than OpenDNS at 20ms. It was launched on April 1 and, while a Sunday is an interesting time for a first-ever consumer product launch, the 4/1 launch date nicely reflected the chosen IP address, which is itself four ones.
How to setup Cloudflare
To begin using Cloudflare, just go to their website and hit Install — the site will recognize your hardware and take you to specific instructions that promise you’ll be done in two minutes, even with no technical knowledge.
For Windows
1. Go to Control Panel, Network and Sharing Center (or Network and Internet), Change Adapter Settings (or View Network Status and Tasks), and Change Adapter Settings.
2. Right-click your Ethernet/Wi-Fi connection, and click Properties.
3. Select Internet Protocol Version 4 or 6, then select Properties.
4. Click Use The Following DNS Server Addresses.
5. For most people (IPv4), use addresses 1.1.1.1 and 1.0.0.1.
6. For IPv6, use 2606:4700:4700::1111 and 2606:4700:4700::1001.
7. Select OK, close your settings window, and restart your browser.
For macOS
1. Go to System Preferences, Network.
2. Click on Ethernet/Wi-Fi and select Advanced.
3. Click DNS and clear all entries in the DNS Servers section using the minus sign.
4. Add 1.1.1.1 and 1.0.0.1 (for IPv4) or 2606:4700:4700::1111 and 2606:4700:4700::1001 (IPv6) using the plus sign.
5. Hit OK, then Apply.
6. Close the Network window and restart your browser.
For iOS
1. Select Settings, Wi-Fi, and the “i” next to the wireless connection symbol.
2. Go to Configure DNS, select Manual, delete existing DNS entries.
3. Add 1.1.1.1 and 1.001.
4. Save.
For Android
1. Using Cloudflare on Android is a little more complicated, and they recommend configuring your wireless router instead. To do this, pull up the router settings (instructions will differ based on your router, but a quick search online should help).
2. Click on the area where you can change DNS settings, which may be under Advanced.
3. Replace existing DNS settings with 1.1.1.1 and 1.0.0.1 (for IPv4) or 2606:4700:4700::1111 and 2606:4700:4700::1001 (for IPv6).
4. Save and restart.
Sources: 1.1.1.1, The Verge, Cloudflare
Image Source: Pixabay
Advertisement
Learn more about Electronic Products Magazine


