By: Michael Day, Principal Member of Technical Staff
Abstract: This application note provides step-by-step instructions for calibrating the PMBus™ parameters, IOUT_CAL_GAIN and IOUT_CAL_OFFSET, that are used by our InTune™ MAX15301 and MAX15303 digital power supplies to report output current.
Introduction
A major benefit of digital power solutions is the ability to read the actual load current in real time over the power management bus (PMBus). The load current measurement is possible with knowledge of the current-sense element’s impedance. The current measurement’s accuracy is a function of many parameters such as board parasitics, the measurement component’s tolerance, and the IC’s internal gains and offsets. If the variations in these parameters are not accounted for, the measured load current will not be as accurate as one might expect. Fortunately, the PMBus specification provides two calibration coefficients, IOUT_CAL_GAIN and IOUT_CAL_OFFSET (collectively referred to as IOUT_CAL values), which allow the user to calibrate out the parameters that affect the current measurement’s accuracy. Every InTune IC is shipped with default values for these coefficients. These values must be calibrated to provide accurate output current measurements.
When is Calibration Needed?
An IC’s IOUT_CAL values should be calibrated at the initial board build and at any time when the current-sensing circuitry is changed. Maxim Integrated’s digital power evaluation (EV) kits are shipped with IOUT_CAL values that are specifically calibrated to each EV kit’s inductor. This allows the user to experience accurate current measurement right out of the box. Our EV kits are designed to allow the user to easily modify the kits for their specific operating requirements. However, any modification to the output inductor, current measurement filter components, or the digital power IC require the user to recalibrate the IOUT_CAL values to ensure that the design properly reports an accurate load current measurement. For instance, replacing the output inductor with another inductor that has the same part number does not necessarily require recalibration. The exact change in accuracy is a function of the change in the new inductor’s actual inductance or resistance. However, replacing the output inductor with another inductor with a different part number always requires recalibration to ensure an accurate output-current measurement.
In this application note, Maxim provides an easy-to-follow procedure for calibrating new IOUT_CAL_GAIN and IOUT_CAL_OFFSET values that are optimized for your modified design.
Recommended Equipment
-Maxim InTune EV Kit
-Maxim’s MAXPOWERTOOL002# USB-to-PMBus interface kit
-5V to 12V DC lab supply capable of supplying the current required by the EV kit
-Current meter
-Load (electronic or resistive)
-PC with Windows® operating system and available USB port
-PowerTool graphical user interface (GUI) installed on the computer. Visit the EV kit’s tool folder for a link to the -latest version of the GUI.
-Maxim’s InTune Digital Power Current Calibration Worksheet (XLSX)
Precautions
-Verify that the lab supply is configured for a voltage within the InTune EV kit’s absolute maximum limits before connecting and turning on the supply.
-Do not turn on any power supplies until all electrical connections have been completed.
-Do not exceed the current rating for the test leads used to connect VIN and VOUT.
-Do not exceed the current capability of the current meter.
Setup
Refer to the InTune EV kit data sheet for detailed instructions on setting up the EV kit. This current-calibration procedure requires an accurate load current measurement, which can be accomplished by using one of the following three methods:
If using an electronic load with a current reading, the current reading on the load can be used. Note that most labs do not use electronic loads with calibrated voltage and current readings. Ensure that the electronic load is properly calibrated.
If using discrete load resistors, the load current can be calculated by measuring the voltage across the resistor and dividing by the resistor value. Typical resistor values used for these load currents are not very accurate and may have a large temperature coefficient that further affects the current measurement’s accuracy.
Use a separate, calibrated current meter. This is the recommended technique and provides the most accurate measurements that result in the most accurate load current measurement by the InTune IC.
Figure 1 shows a typical measurement setup using a current meter.
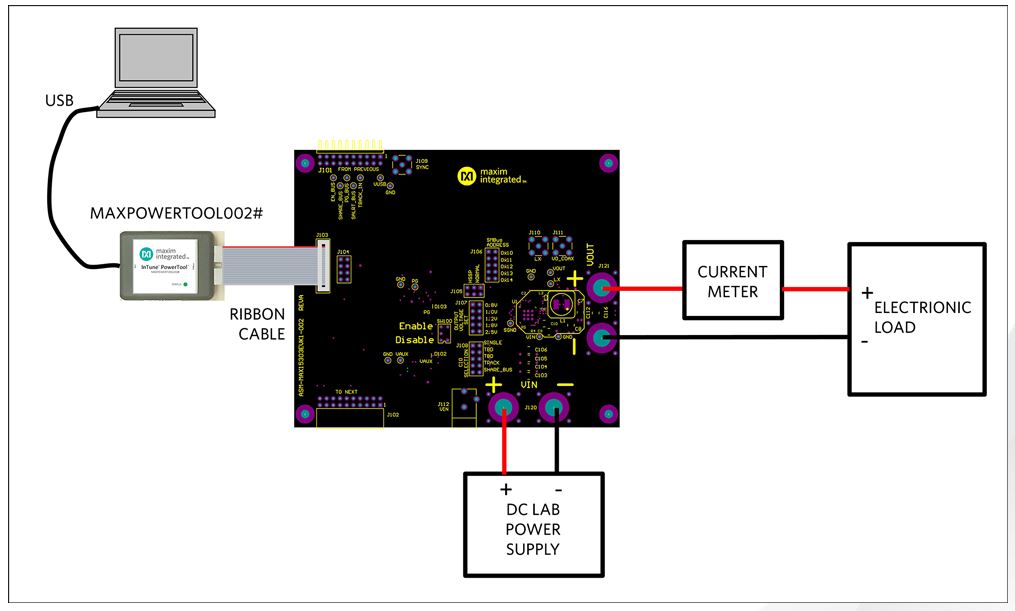
Figure 1. Current-calibration test setup.
Procedure
This procedure assumes that the user has read the EV kit data sheet and has properly configured the EV kit jumpers, connected the test setup, applied power, has the PowerTool GUI software running, and turned on the EV kit so it is supplying a regulated output voltage. To obtain the most accurate results, the current measurements should span the expected range of load currents for the design. Although the procedure works with a minimum of two current measurements, additional measurements provide more accurate results. With the setup turned on and operating, follow the steps outlined below to recalibrate the InTune converter’s current measurements:
In the accompanying InTune Digital Power Current Calibration Worksheet (XLSX), enter the Starting IOUT_CAL_GAIN and Starting IOUT_CAL_OFFSET values.
1. In the PowerTool GUI, these values can be found in two places. The first is on the Configuration tab (Figure 2) and the second is on the PMBus Command tab -> Configure tab. The values on the Configuration tab are a rounded version of the values found on the PMBus Command tab -> Configure tab. The PMBus Command tabConfigure tab values are the values used internally by the IC. The two values may not be identical due to the accuracy limitations of the PMBus specification. For the recalibration procedure, use the values from the PMBus Command tab -> Configure tab.
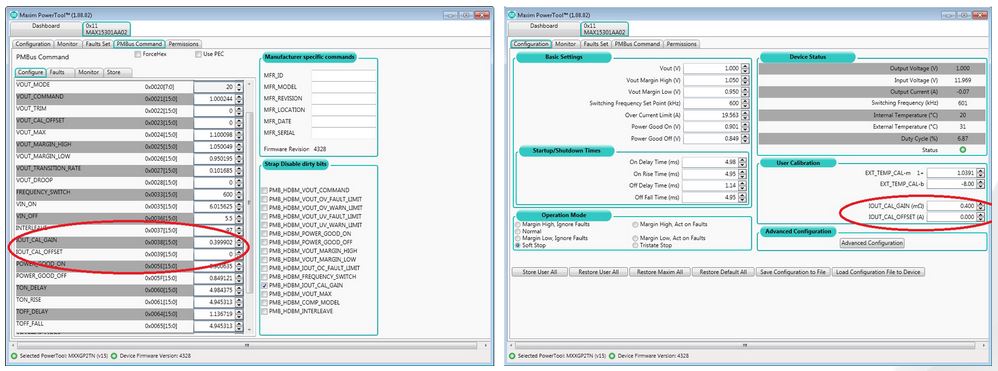
More detailed image Figure 2. Location of the IOUT_CAL_GAIN and IOUT_CAL_OFFSET values.
2. In the Faults Set tab, disable IOUT OC FAULT (A) by selecting Ignore to eliminate the possibility of overcurrent faults due to incorrect IOUT_CAL values (Figure 3). Be sure to stay within the current capability of the design.
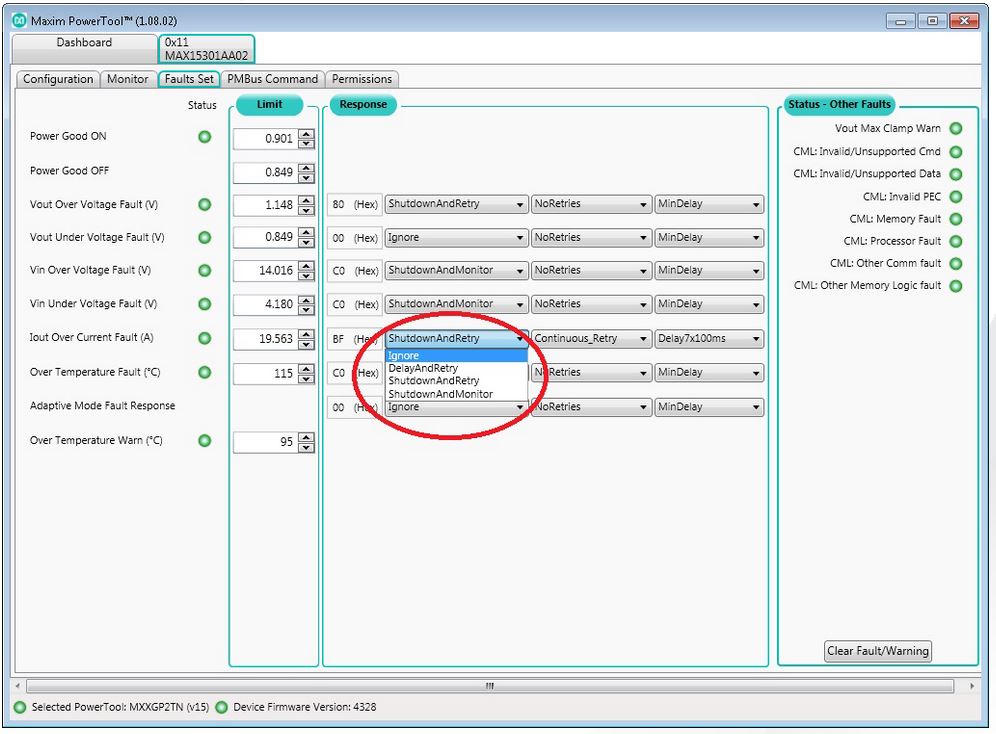
Figure 3. Disabling the overcurrent fault.
3. Adjust the load in the lab equipment to the lowest desired load current.
4 . Enter the load current value, as measured by the current meter in the Excel spreadsheet’s Actual IOUT (A) measurement column.
5. Enter the load current value displayed in the GUI in the Excel spreadsheet’s Monitored IOUT (A) measurement column. The current value is displayed in two places in the GUI (Figure 4). The first is the Output Current (A) on the Dashboard tab and the second is the Read IOUT (A) on the Monitor tab. These values are identical. Note that the monitored output current constantly changes due to both differences in load currents and noise introduced into the measurement. Try to enter an averaged value of the load current.
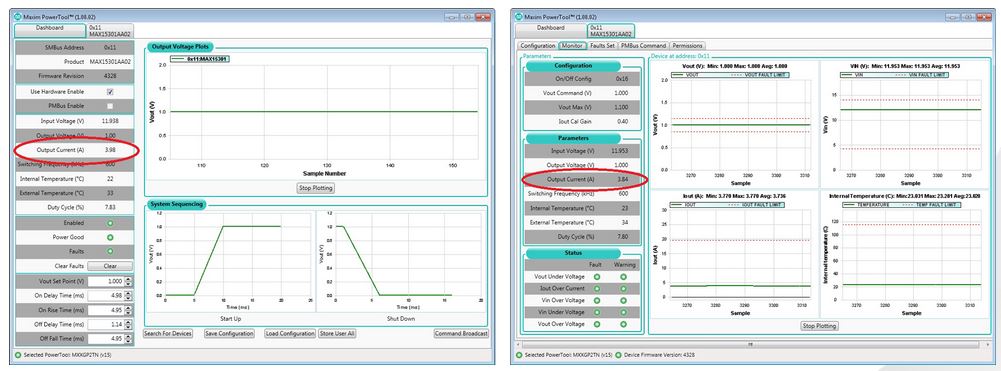
Figure 4. Location of monitored IOUT.
6. Increase the load current and enter the actual and monitored output currents in the spreadsheet for a total of up to eight data points.
7. The spreadsheet now provides New IOUT_CAL_GAIN and New IOUT_CAL_OFFSET values that must be programmed into the InTune IC.
Enter the new values in the GUI on the Configuration tab. At this point, the GUI’s reported load current should match the actual load current.
Note: The InTune digital supply is currently using the New IOUT_CAL_GAIN and New IOUT_CAL_OFFSET values, but these values are not permanently stored in the IC. Power cycling the input voltage to the IC erases the New IOUT_CAL_GAIN and New IOUT_CAL_OFFSET values. As a result, the IC reverts to previously stored values.
Significant changes to the IOUT_CAL values may cause the IC’s internal circuitry to switch between different gain ranges. Rerunning the calibration procedure a second time ensures proper calibration.
8. Permanently store the New IOUT_CAL_GAIN and New IOUT_CAL_OFFSET values in the IC by clicking on the Store User All button in the GUI (Figure 5). Note that clicking on Store User All writes all the changed PMBus commands on the Configuration tab to the IC. If you wish to store the IOUT_CAL values but not disturb the rest of the settings, be sure not to change any other settings between the time that power is applied to the IC and the Store User All button is clicked.
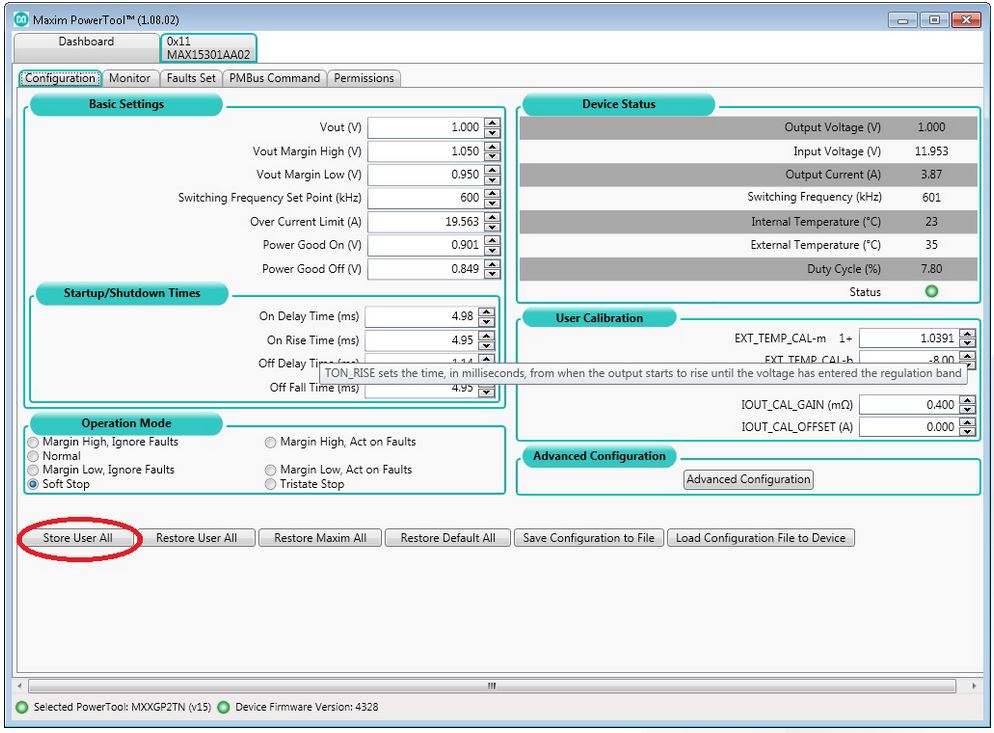
Figure 5. Enter the IOUT_CAL_GAIN and IOUT_CAL_OFFSET values.
Setting IOUT_CAL_GAIN and IOUT_CAL_OFFSET Values During Production
The ideal situation for a production environment is to set common IOUT_CAL_GAIN and IOUT_CAL_OFFSET values in each power supply. This can be achieved by characterizing the inductor on 10 or 20 individual power-supply boards and then using the averaged IOUT_CAL_GAIN and IOUT_CAL_OFFSET values on the production builds. The advantage of using averaged IOUT_CAL values is reduced production test time. The disadvantage is that the current measurement’s accuracy is degraded by the variation in inductor-to-inductor DCR.
Conclusion
The procedure outlined in this application note explains how to recalibrate an InTune digital power IC’s IOUT_CAL_GAIN and IOUT_CAL_OFFSET parameters to ensure an accurate load current measurement. Recalibration is recommended any time the output inductor, current-measurement filter components, or the digital power IC components are changed.
Advertisement
Learn more about Maxim Integrated


