With the release of the highly anticipated new Star Wars movie The Force Awakens, what better way to honor the occasion than by introducing a guide on how to build one of the most legendary pieces of lore: the lightsaber.
The lightsaber is a unique weapon that only someone possessing the Force can wield and build. Let's take a look at how you can build your own:
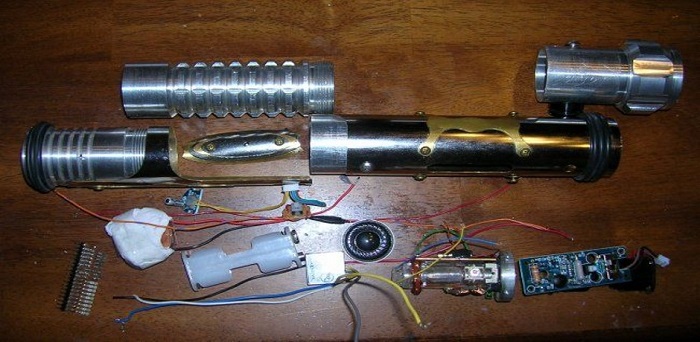
There are three main components that a lightsaber is comprised of: the hilt (handle), electronics, and the blade. In the Star Wars universe, the blade consists of plasma and the color is created by a Kyber crystal. But in reality, your lightsaber will be made of a slightly more modest material like polycarbonate and the color of it will be determined by what LEDs you choose.
Part you’ll need for the blade:
1 x 30-36 inch long Polycarbonate (pc) tube, thick wall 1 inch outside diameter (OD). Wall thickness should be 1/8 inch. This is the blade.
1 x end cap for the pc tube (blade tip)
1 x blade film (“corbin” film is great)
1 x reflective material with a diameter smaller than the inner diameter of the PC tube.
The hilt of a light saber is similar to a fingerprint – unique to every owner and created to certain specifics. In terms of the hilt, there are a few options, including creating one from scratch a la CAD file or buying one from a reputable retailer like ultra sabers.com.
Materials needed for the hilt:
1 x blade/LED holder (aka the emitter)
1 x 1.5 inch chrome sink tube. 12 inch long
1 or 2 x sink tube adapter. 1 to attach the blade holder to sink tube and 2 if you have opted for a machined pommel.
1 x switch or button
1 x pommel or end cap
1 x blade/LED holder (aka the emitter)
1 x 1.5 inch chrome sink tube. 12 inch long
1 or 2 x sink tube adapter. 1 to attach the blade holder to sink tube and 2 if you have opted for a machined pommel.
1 x switch or button
1 x pommel or end cap
It’s important that your hilt (or handle) is built sturdy, as it not only houses the electronics, but also holds your blade in place.
The final abundance of items needed to complete a lightsaber build includes the electronics such as the laser emitters and batteries.
The list is as follows:
1 x High power LED (luxeon III, K2, V, Rebel; seoul P4, or any LED with a lumen output above 60). Decide if you want to buy an LED emitting a certain color or a white LED and use color filters.
1 x compatible optical lens to focus the LED to 10 degrees or less.
1 x method to control the current going into the LED – the creator of this list used a BuckPuck as a resistor is less efficient.
Finally, you will need a few additional tools to assemble your device together with:
Solder iron 45 watt or higher and some good quality solder.
Hack saw
Rotary tool (Dremel) with sanding drum, cut-off wheels, grinding and shaping tools.
Drill and drill bits
Jeweler's files
A screw tap set
Screw drivers
Allen wrenches
Hammer
Glue for metal or epoxy
Elmer’s glue
Graph paper
Pencil
Sharpie
Sand paper, course and fine assortment
The assembly can be simplified if the polycarbonate blades and metal hilts are purchased ready. There are a few important steps to take to get the best possible results.
Step One: Prep the blade
The clear polycarbonate blade doesn't glow well due to its transparency, so we recommend using a diffuser film to disseminate those bright lights. Corbin film or any 3M diffusion film will help lend that coveted “plasma” glow. To apply this film, all you’ll need to do is cut to the desired length, roll it up, and slide into the hollow blade. You’ll also want to finish the end of your blade with a round end cap in order to complete the effect.

Step Two: Mate the blade to the handle
Step two involves inserting your blade into the holder that is mounted to the handle or hilt. This step is easy enough to perform, as all you have to do is slide the blade into the holder and lock it down with a small set screw. The holder and the hilt are threaded and should twist together snugly.

Step Three: Assembling the electronics
This is where this build can get a bit tricky, but we have broken it down into a Basic, Mid-level, and High guide with upgrades in between levels depending on the type of functionality you want. More lights and sounds will cost you more money, but the Basic build by MrTinkerer will only set you back around $160.
The Basic build features bright LEDs without any sound, which helps keep the costs in check. This design is also the simplest, as there isn’t any programming needed for sound. It’s important to lay out your electronics first to approximate where everything will go and so you can cut your wires to the proper length.
If you’re interested in the final assembly notes, check them out here, as put together by MrTinkerer.
Have fun and may the force be with you!
By Aaron LaBarbera
Advertisement
Learn more about Electronic Products Magazine


