Building your own printed circuit board is an invaluable skill set in the arsenal of any self-serious electronics hobbyist or “hands-on” entrepreneur; it does not require any special sort of wizardry and can yield a completed result within less than an hour. In other words, you can proto-type projects immediately upon completion as well as save money on low volume production runs since contracted PCB producers typically deal in bulk.
In short, the required steps are to print, clean, cut, paste, iron, brush, etch, and clean. But before we get started, make sure to procure the following items: a magazine, advertising brochure, or any other similar glossy paper, a laser printer, a clothing iron, copper clad laminate board, one liter of etching solution (ferric chloride solution), steel wool, acetone, and adhesive tape.
Designing the PCB
Any PCB design program will suffice, but for those seeking a user-friendly and open-source design program, consider Fritzing. The freeware allows you to design circuits on a virtual breadboard before automatically producing a schematic representation of the whole system and converting it into an actual PCB layout. Components are available in a large crowd-sourced database, so chances are you’ll not run lack anything.
Paper selection
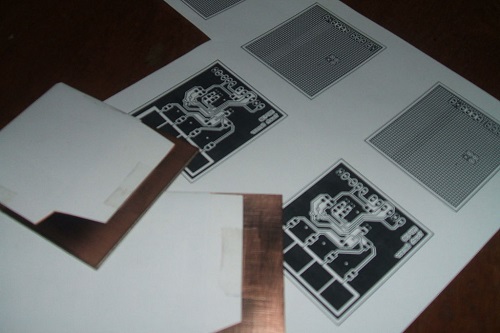
After successfully transferring the design on to a PCB layout, equip your laser printer with either old magazine paper, mail advertising or any paper that is glossy, thin and cheap. You’ll know you’ve selected the correct paper thickness if added water disintegrates it into a pulpy residue.

Print PCBs designs with a laser printer guarantees a clean result. Image courtesy of Instructables
Now that the paper’s been fed, it’s time to use the laser printer and print the design. I specify laser printer because of its reliance on plastic toner to replicate images rather than ink. Recall that plastic is resistant to the ferric chloride we use for etching; this is why the circuit design is left behind on the board once we’ve etched away the surface copper. It is imperative that the PCB layout is printed as a mirror image of itself or it will appear reversed once transferred to the copper board.
Cleaning
Before transferring the plastic toner onto the copper-clad board, spotlessly clean the copper surface using steel wool to remove any oxide. Now that the surface has been completely smoothened, it’s time to don a pair of latex gloves and clean off finger residue. The goal is to create a completely pristine board to allow perfect bonding with the plastic toner from the magazine paper.
Cut and paste.
When the copper board is ready, it’s time to cut out the design. Leaving an extra margin on one side makes it easier to correctly align the paper later in the process.
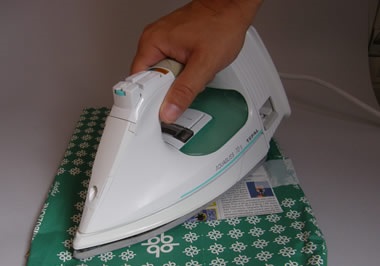
Any household iron is suitable for transferring the toner onto the board so long as it’s set to maximum heat in the cotton position with absolutely no steam. Once you’ve set the iron to its respective temperature, prepare the paper and board as the iron is heating up. First, find a level surface to work with. Ironing boards are not suitable for this task because of their soft surface. Whatever surface you decide to use, be it kitchen table or not, place a flat, heat-resistant material underneath the board. Ensure copper surface of the board is facing upward in preparation for contact with the PCB cut out.
Next, place the PCB cut out on top of the copper board with the toner side facing the copper. Once the correct aligned is established, use tape on the lengthier margin to secure the paper in place. Only tape one side of the print out as the paper will subsequently be flipped to allow us to preheat the copper surface for 30 seconds.

Flip the PCB print out back into position the minute the pre-heating is complete. This is a tricky process because the copper’s already been heated, however the careful positioning prior to locking the paper with tape, permits it to fall into place correctly. After setting the paper in place, cover it with a second sheet of blank paper to more evenly distribute heat. Now press down with the iron for eight to ten minutes and evenly distribute heat as best you can. Too short of an exposure will not attach the toner to the copper surface.
Dunk and brush
As soon as the iron is removed, submerge the copper board in room temperature water for about one minute or until the paper becomes transparent. At this point the paper can be gently removed by scrubbing with your fingertips – remember that pulpy paper we talked about? Any stubborn pieces should be carefully brushed off with a toothbrush.
Etch the copper off the board
Etching is how we remove all non-masked copper from the board to give us those beautiful sharp lines. Recall that the toner we just bonded to the board is resistant to Ferric Chloride, so anything not covered with plastic toner will be melted away by the etchant until the underlying plastic is exposed. When a circuit is converted into a PCB print out, the conductive pathway of the circuit is covered in plastic toner; this is why PCB print outs are analogous to photo-negatives of circuit boards.
The most common solution used for etching is Ferric Chloride, although some use Ammonium Persulfate. Ferric Chloride is cheap, reusable, doesn’t necessarily require heating, and is available in either liquid or powder form. The substance can perform adequately at room temperature, although the etching process is expedited when the chemical is exposed to heat and agitation.
Place the Ferric Chloride in an old plastic freezer container and microwave it for 40 seconds until the container is hot enough to be uncomfortable to hold, and then slosh it around to get it nice and angry. Be careful not to overheat the etchant otherwise it will start producing hydrochloric acid fumes. As a safety precaution, use plastic or latex gloves when handling Ferric Chloride; it stains everything it contacts and irritates skin. Use lots of running water if ever disposing FC or it will corrode your drain pipes.
How long do I etch?
Etching takes between ten to fifteen minutes to complete; because the process gradually reduces the amount of copper through corrosion, nothing may appear to happen for the first ten minutes. Once you’ve noticed the first evidence of plastic, begin to periodically stir and check, as there isn’t much copper left. Stop approximately 30 seconds after you see any copper leftover in larger spaces.

Image courtesy of Instructables
The final touch
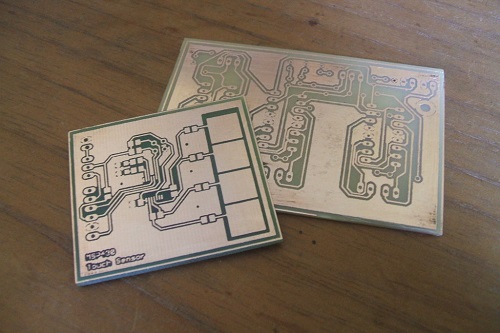
The final step is to rinse the board in water until all traces of FC are removed and then proceed to remove the toner. This is accomplished with over the counter acetone or nail polish remover applied to a cotton ball and light pressure. The toner will come right off and leave you with a beautiful set of copper tracks that is your circuit path. That’s the advantage of the laser printer and magazine paper combo: It leaves with perfectly accurate tracks
Source: Instructables
Advertisement
Learn more about Digi-Key


