Image Source: GASCV.org
The days of depending on CDs and DVDs for storage usage have come to an end, calling for a more reliable and updated way to keep that vital information safe. Your best option for transferring these files is to carry them over to a data drive, but there is a particular way to ensure that this process goes well. “The wrong way [to digitize CDs and DVDs] is to simply copy and paste the contents of a disc onto your computer,” Joel Lee writes. “This will work if the disc contains nothing but data files. But it will backfire if the disc is meant to be runnable.”
According to Lee, the correct way is actually to create a disc image, which is a file that “replicates every bit of data that exists” in any aspect of a CD or DVD. Essentially, a disc image creates the original disc’s complete status at the time of copying. The ultimate benefits of copying and mounting disc images on a virtual drive include the ability to find your data easily and having better organization overall. Below are Lee’s instructions on the best ways to create and mount these disc images.
To back up a physical disk, you’ll first need to download and install the free app DAEMON Tools Lite, a source allowing you to set specific options when copying files and even create audio CD images if needed. A $6 version that will support up to three PCs is also available.
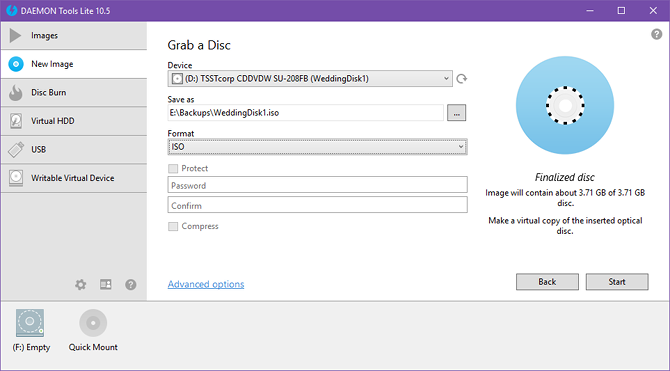
After installing the program and putting your CD into the optical drive, launching DAEMON Tools Lite will present a sidebar option from which you choose commands. By first selecting the “New Image” option, you’ll have the choice to “Grab a Disc.” This will lead to matching up the program with the correct drive on the computer and then choosing “ISO” to begin the file transfer. All that’s left to do is to choose where the disc image should be saved, then wait for the file to finish.

Mounting disc images is a slightly different but just as simple process. While you can always find other apps to virtually mount files (Lee recommends WinCDEmu), it’s also possible to use DAEMON Tools Lite again. Click on the DAEMON Tools icon and pick “Virtual Devices” to sync the system with your drive. After picking “Mount,” pick out your file.

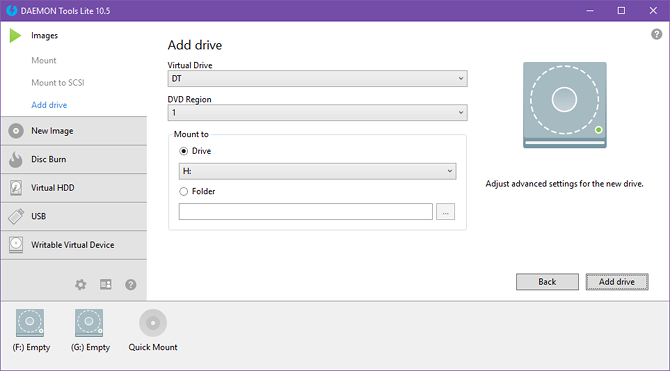
Want to make even more virtual drives? After matching up your drive with DAEMON Tools Lite, select “DT,” “SCSI,” or “IDE.” When asked for your DVD Region, keep the setting at 1. Find the “Mount to Drive” option and then click “Add Drive.”
Nowadays, it’s always better to be safe rather than sorry and find that extra protection method for your files on outdated CDs. Creating and mounting disc images is definitely a reliable way to do this.
Source: Make Use Of
Advertisement
Learn more about Electronic Products Magazine


