You might have seen it in a futuristic Hollywood blockbuster, but did you ever think about how you can build your own magic mirror and be the star of the show yourself? If you’re unfamiliar with what exactly a magic mirror is, it’s a smart mirror capable of displaying your daily schedule, the date and time, weather, and other important updates. Read on below to see how you can make your very own.
First thing’s first: the project itself is slightly complicated. It takes a two-way mirror, an old computer monitor, and a Raspberry Pi, which provides the power. No low-level hacking is required.
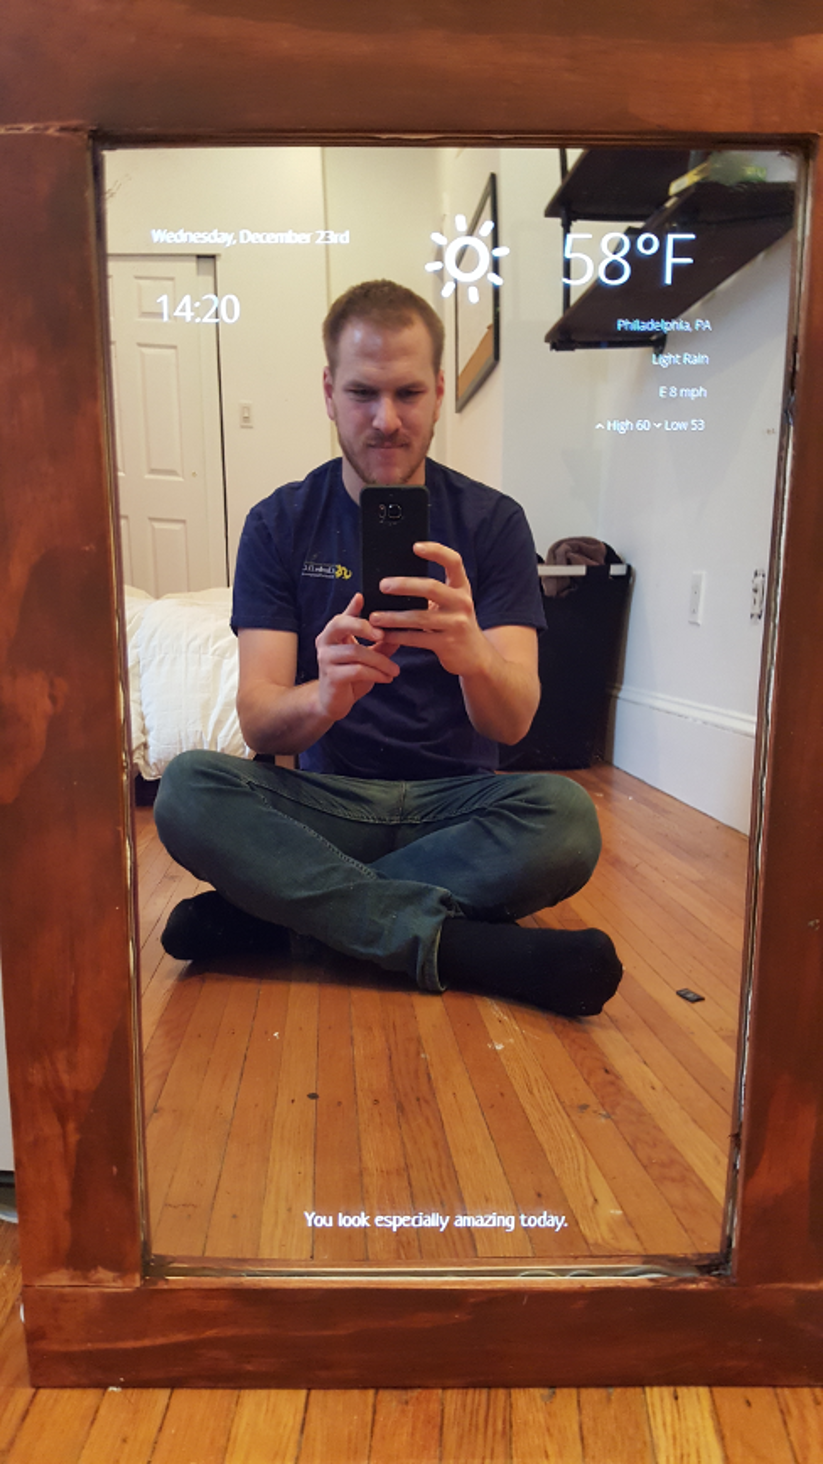
Blogger Dylan Pierce and his magic mirror.
For a complete break-down, here’s what you’ll need.
- A computer screen (that you can take apart)
- An observation mirror
- A Raspberry Pi with casing along with a micro USB power cord
- A SD-card (8GB)
- A network adapter
- Wood frame
- HDMI-to-VGA-adapter
- A mouse and a keyboard with USB
- A second computer (for fixing OS)
Select a monitor and mirror
When it comes to the size of the mirror, it depends on the kind of monitor you select. One important aspect is to make sure you get a monitor with the inputs located towards the center of the monitor rather than on the sides. Otherwise, it could be difficult to fit the frame, and the Raspberry Pi’s HDMI cord must also fit.
Being the most essential piece of the whole project, the mirror, being acrylic and plastic-like, is easier to work with compared to an actual mirror. It’s simple (and safer) to cut it in several different ways to make it fit the way you need. Be sure to order a mirror that’s close in size to your monitor so you can build with ease.
Build the case
Building the case doesn’t require much work. This part is basically all about cutting your pieces to fit the monitor into the case. By doing this, you’ll be able to remove the monitor without any issues.
An important tip here is to screw holes at the top and bottom of the case, giving the Raspberry Pi some airflow. You should also make one of the holes at the bottom of the case large enough for a power plug to fit through, since you’ll need it when you’re wiring your monitor and Raspberry Pi’s power through the case.
Attach the frame to the case
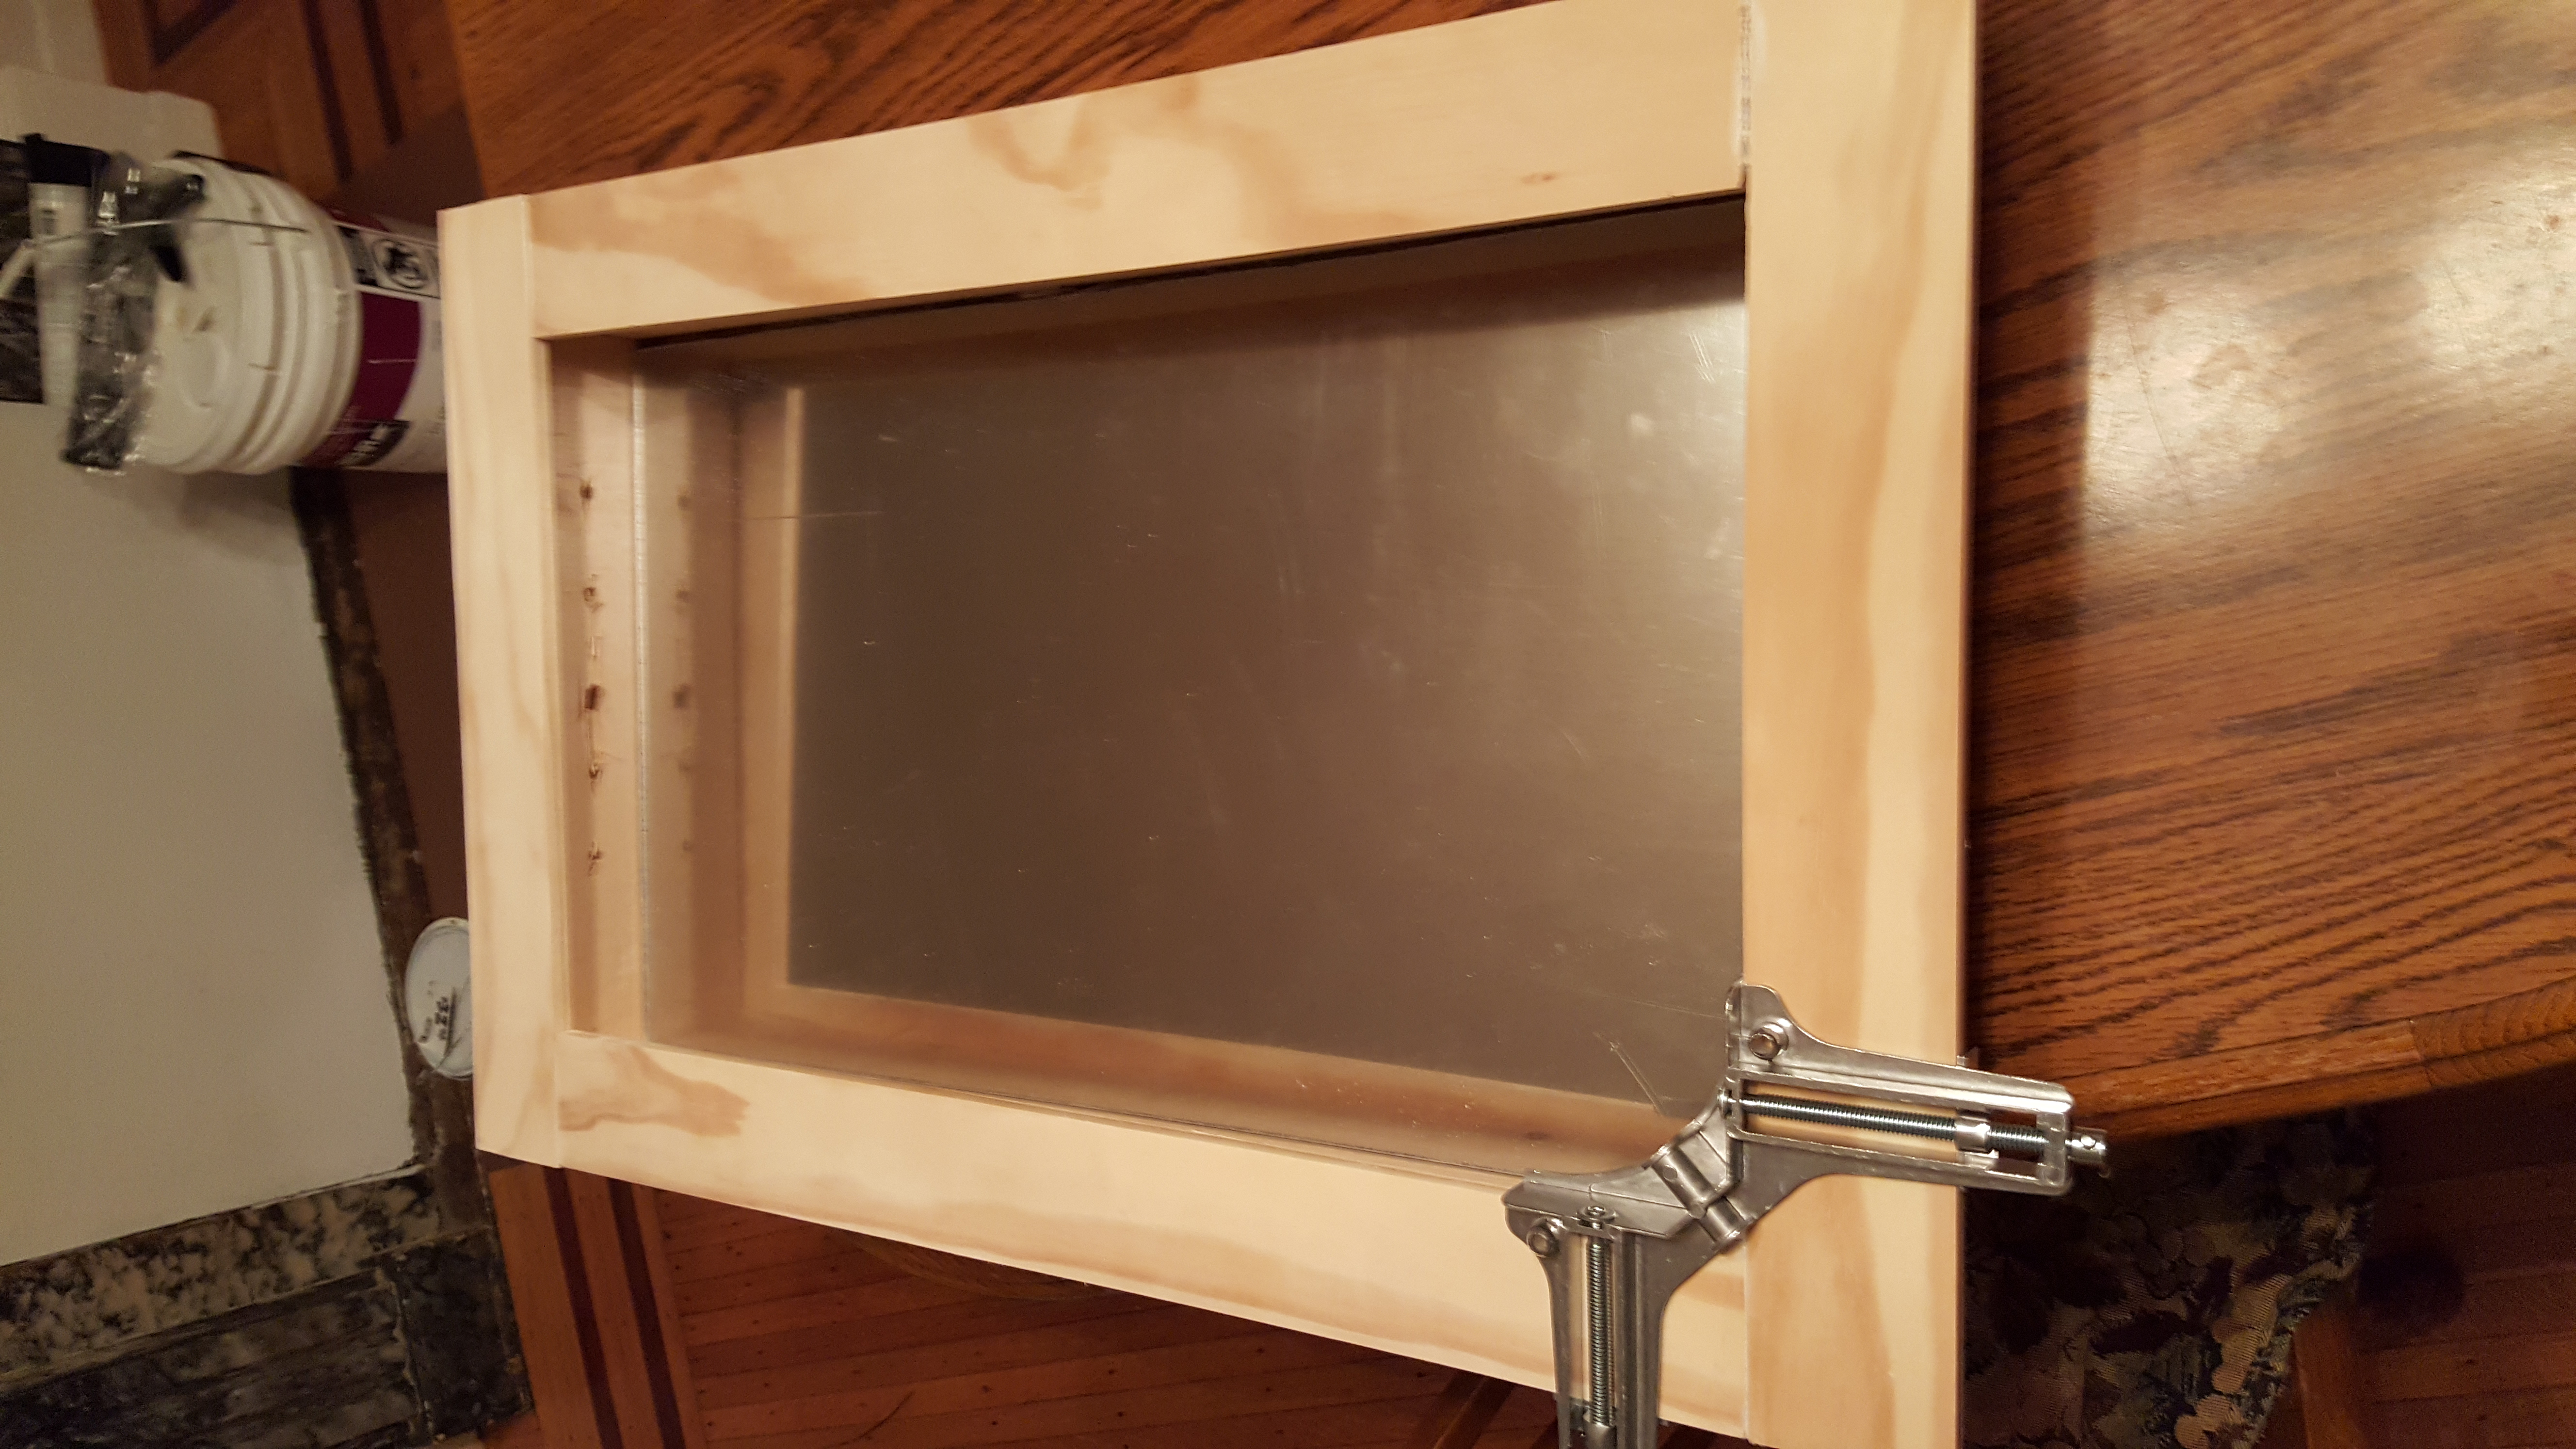
This step may be the simplest of all. To avoid a hassle, be sure to stain the frame and case separately before gluing the mirror between them. Afterwards, gluing everything together is all there is to it.
Install the Raspberry Pi
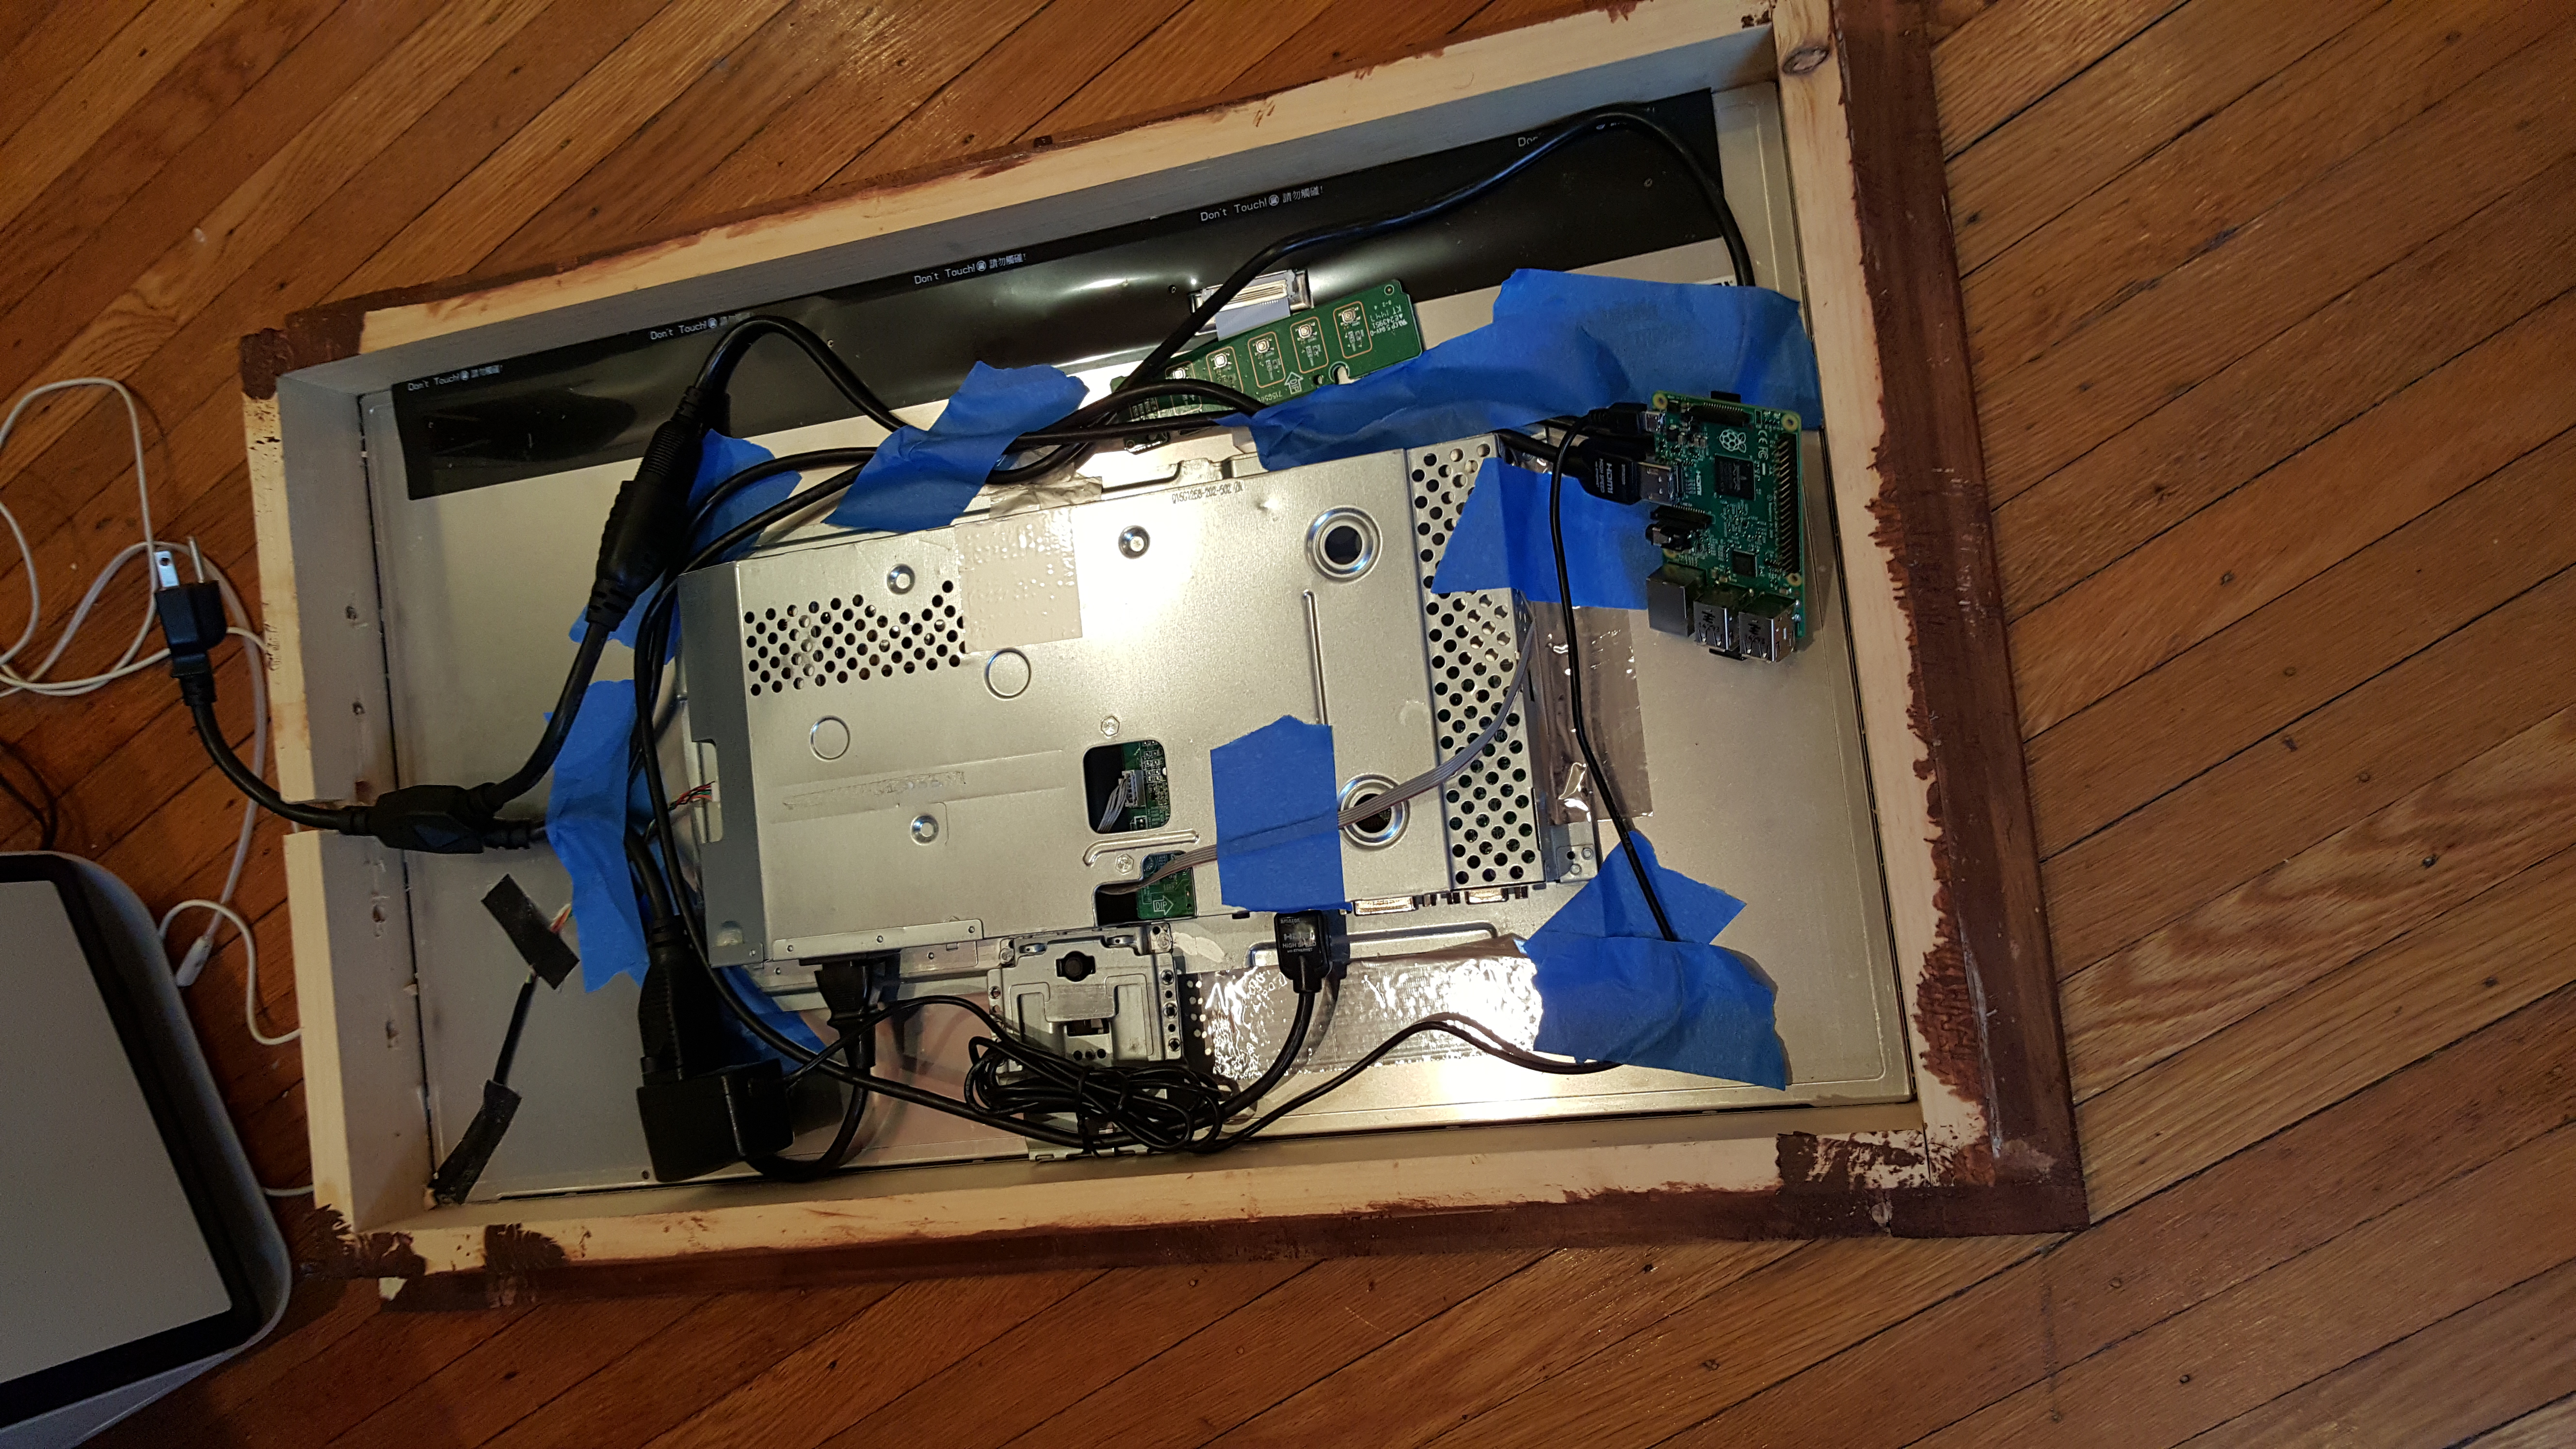
Now the fun begins. Ideally you’d want to have just one cord coming out of the bottom of the case to supply power. The easiest way to do this is to buy a two-way power splitter. Then all of the components can nicely fit together on the back of the monitor, with the help of some industrial tape, as pictured above.
The point of this is to supply power to both the monitor and the Raspberry Pi with a single cable. Simply hook up the Raspberry Pi to the monitor, and Ethernet to the router. Next, if you already hadn’t, you’d have to install Raspbian, the Raspberry Pi Foundation’s official operating system. Once you’re through the NOOBS installation process, you’ll be rewarded with the Raspberry Pi boot sequence.
Turn the Raspberry Pi into a kiosk
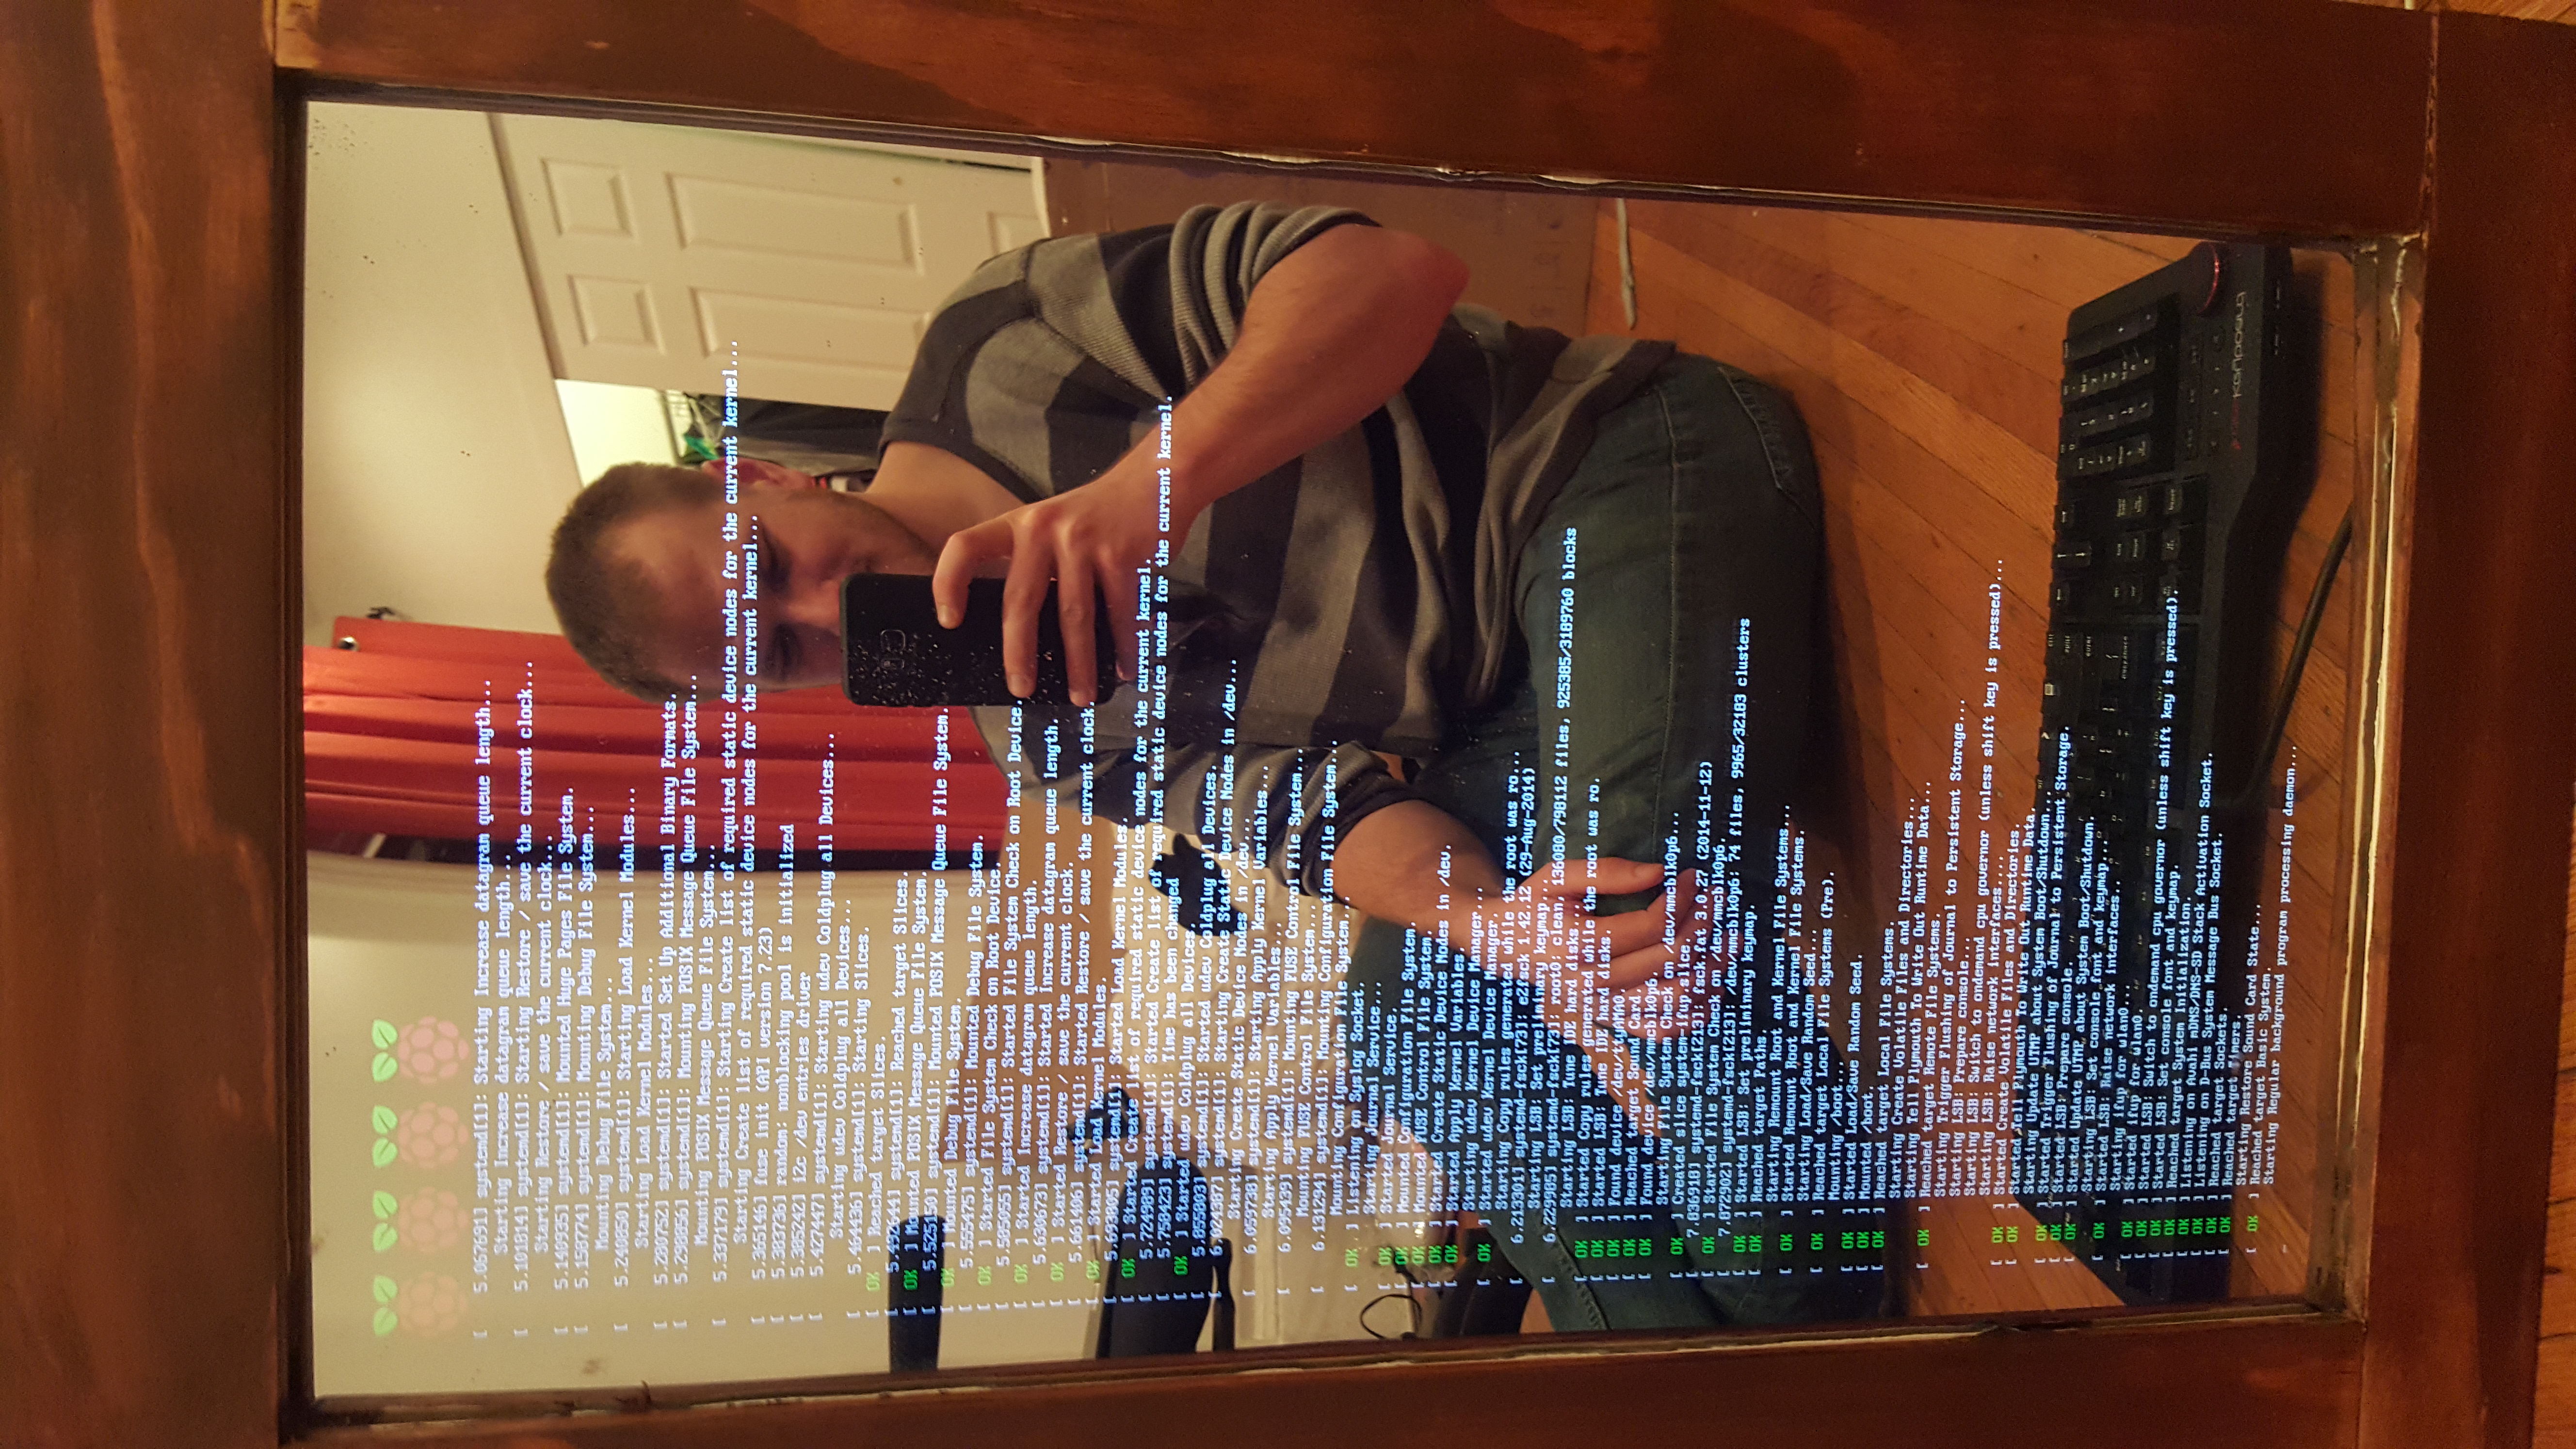
It doesn’t make sense for your magic mirror to just display the Raspberry Pi desktop, and fortunately, there are a few ways to get your Raspberry Pi to work like a kiosk. Blogger Dylan Pierce had luck following the following steps while building his mirror.
Install Chromium
Depending on your Raspbian version you may run into a few issue with this. The raspberry Pi behind Pierce's mirror (pictured above) is running version Jessie of the Raspbian OS. There have been some changes to the Raspbian repository, including the removal of Chromium, which is the easiest browser to set up as a kiosk.
You can browse the Internet, but Pierce found that this is what worked best:
wget http://ftp.us.debian.org/debian/pool/main/libg/libgcrypt11/libgcrypt11_1.5.0-5+deb7u3_armhf.deb
wget http://launchpadlibrarian.net/218525709/chromium-browser_45.0.2454.85-0ubuntu0.14.04.1.1097_armhf.deb
wget http://launchpadlibrarian.net/218525711/chromium-codecs-ffmpeg-extra_45.0.2454.85-0ubuntu0.14.04.1.1097_armhf.deb
sudo dpkg -i libgcrypt11_1.5.0-5+deb7u3_armhf.deb
sudo dpkg -i chromium-codecs-ffmpeg-extra_45.0.2454.85-0ubuntu0.14.04.1.1097_armhf.deb
sudo dpkg -i chromium-browser_45.0.2454.85-0ubuntu0.14.04.1.1097_armhf.deb
Run Chromium on startup
Once Chromium is installed, you can configure it to open on startup and in full screen mode:
Open the autostart settings:
sudo nano /etc/xdg/lxsession/LXDE-pi/autostart
Disable the screensaver by adding a # in front of the line:
@xscreensaver -no-splash
And add the following lines:
@xset s off @xset -dpms @xset s noblank /usr/bin/chromium –noerrdialogs –kiosk –incognito “http://localhost”
Exit and save. Now you’ve disabled the screensaver, disabled power management settings, and have the Chromium browser opening in kiosk mode on localhost on startup.
Using your Wi-Fi network
There are a number of tutorials for getting your Raspberry Pi on wireless. If you’re already in terminal, it’s as easy as editing your wpa_supplicant file:
sudo nano /etc/network/interfaces
And edit the network setting:
network={ ssid=”Network name here” psk=”password” } I’m assuming you’re smart and not using the ancient and insecure WEP protocol on your router.
Now restart your Wi-Fi connection with these two commands:
ifdown wlan0 ifup wlan0
Don’t worry if you see an obscure error. You can experiment to make sure your change worked by using ifconfig.
If you’re wlan0 device has an assigned IP address, you’re free to disconnect the Ethernet connection and install your backboard.
Set up the webpage
With a functioning kiosk of sorts, it’s time to get the actual webpage up and running. Pierce has written his own application for this, and encourages others working on this project to use it. He used the PHP micro-framework Lumen with jQuery and Moment.js.
Installing a web server
In order to host the webpage you’ll need to install a web server, and to run Lumen you’ll need php installed:
sudo apt-get update sudo apt-get install nginx php5-fpm php5-cli php5-mcrypt git
This could take a while, but once it completes, you need to configure Nginx to know where the MirrorMirror site is located:
sudo nano /etc/nginx/sites-available/mirror.conf
Then paste the configuration in this gist:
Be sure to save and exit. Next, activate this configuration by running:
sudo ln -s /etc/nginx/sites-available/mirror.conf /etc/nginx/sites-enabled/mirror.conf sudo service nginx reload
You should now have a php enabled web server running on your Pi.
Installing MirrorMirror
This is the final step of the project, installing the actual webpage. Make a folder projects inside of /home/pi and move into it:
mkdir /home/pi/projects cd /home/pi/projects
Clone the MirrorMirror web app with this command:
git clone https://github.com/ctrlaltdylan/MirrorMirror.git
Install Composer which will install Lumen’s dependencies:
curl -sS https://getcomposer.org/installer | sudo php -- --install-dir=/usr/local/bin --filename=composer
Use composer to install Lumen’s dependencies to get MirrorMirror up and running:
cd MirrorMirror composer install
Know that Nginx needs to be able to write/read files inside of the storage directory for the Lumen application to work.
sudo chmod -R 777 storage
Go to http://localhost and you should see your version of MirrorMirror up and running.
Current features:
- Displays forecast and animated weather icon.
- Displays date and time.
- Displays a random greeting, currently there’s only one but planning on adding more.
Happy building! If you have any suggestions, leave them in the comments section below.
Source (including all images): blog.dylanpierce.com
Advertisement
Learn more about Electronic Products Magazine


