If you’ve grown up thinking that Halloween was a holiday for children and the severely delusional, then you are sadly mistaken my friend. Halloween is, in fact, a holiday celebrating the creative prowess of men and women engineers, makers, and DIYers; a holiday where months of careful planning, crafting, and refining culminate in the ultimate strut across the catwalk as they scare the bejesus out of their children and spouses. It is a holiday of pranks and mischief, a maker’s paradise of fun Halloween projects.
1. Tesla spirit radio
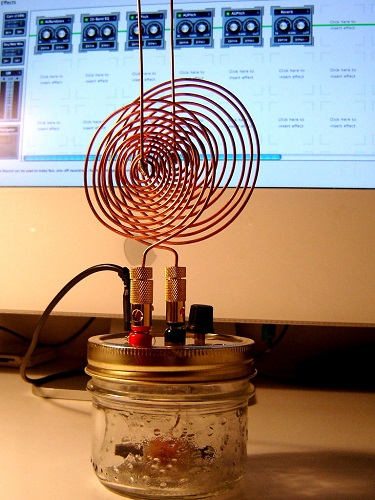
At first glance, the Tesla spirit radio is a crystal radio built into a jam-jar — functional, yet not very Halloween related. But in actuality, the spirit radio is a sound maker that connects to a computer’s sound jack and produces eerie noises by reacting to various kinds of electromagnetic and light sources. The original device was conceived and implemented by genius-savant Nikola Tesla, and incorporated somewhat different components. Nevertheless, the concept is the same: The radio interference produces creepy voice-like sounds that terrified even Tesla himself. Unable to find an explanation for sounds, a nervous Tesla uttered in 1909, “My first observations positively terrified me as there was present in them something mysterious, not to say supernatural, and I was alone in my laboratory at night.”

Check MrFixitRick's instructable page for the entire step-by-step tutorial on constructing the spirit radio. The materials for the project cost a total of approximately $30.
List of Materials
1- Small jam jar (Mason jar) with large mouth
1- 3 ¼-inch-dia Plexiglas (or polycarbonate) cover lid, 1/8 inch thick
1- C1 – 60/160-pF Variable Capacitor
1- Extension shaft and knob for above
1- L1 – 680-µH ferrite loopstick antenna (ComtrolAuto #LSA680-1)
1- D1 – Germanium 1N34A diode
1- C2 -0 .001-µF capacitor (marked 102
1- R1 – 47-kΩ resistor
1- Chassis banana jack red
1- Chassis banana jack black
2 – (or more for each antenna) Banana plug
2 -3.5-mm mono chassis jack
a few inches of 20-gauge hook-up wire
solder
1- Audio patch cord, 1/8-inch plug ends
When hit with the laser of a light-sensitive 1N34A diode at 2:05 seconds, the spirit radio produces what sounds like chatter in an alien tongue. If this can frighten geniuses, then there's no doubt it can also traumatize children when used properly.
2. Halloween Monster-in-a-Box
First of all, Halloween forums are apparently a thing [on the Internet], and secondly, Monster-in-a-box is considered a classic ruse by said forum goers. There are two forms of MIB relying on completely different principles.
The first form of the MIB uses a windshield wiper motor, a cam follower, and a rod extended from the cam follower to the lid. As the motor is powered, the rod is propelled upward to partially open the lid at a periodic interval. For a more erratic lid lifting, consider using a hardware store flasher disc to intermittently interrupt the power supply. It's recommended that you use a reel trunked for extra authenticity. Furthermore, microcontroller units can also be used for more advanced MIBs to incorporate relays for fog, lights, and sounds; the whole shebang. Visit Cindybob.com for immensely detailed instructions on building your very own MIB.

The second form of the MIB uses a pneumatic cylinder mounted on the inside of the box, facing the ground. Once the cylinder fills with air, it will dramatically lift the crate a few inches off the ground. After the air pressure is released, the crate crashes back to its original position. This form of MIB produces a shaking effect rather than a lid-popping effect.
3. Arduino moving skull
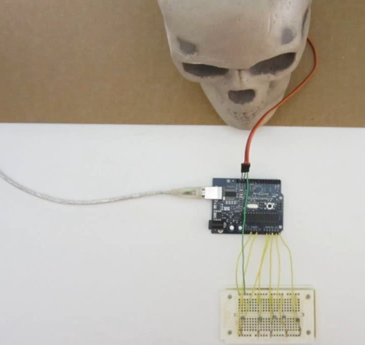
Compared to the previous two projects, building an Arduino moving skull is equivalent to making a grilled-cheese sandwich. There's some preparation required, but you don't have to be a chef to make a banging grilled cheese. The premise behind the skull is this: Light sensors detect a person's shadow as he or she walks by, feed the data to the Arduino, which in turn controls the servo that rotates the skull from side to side in the direction of the moving person.

Be sure to select a very lightweight skull when procuring all the necessary components. Begin by attaching the servo motor to the base of the skull using hot glue. Next, attach the other end of the servomotor to a solid based; this can be a chunk of wood, cardboard, or anything really.
To make the light sensor, we wire a 10-kΩ resistor in series with a photoresistor. The resistor is then connected to the ground, and the photoresistor is connected to 5 volts, making the center voltage change as the light levels change at the center pin. The change in voltage is recorded through the Arduino's analog input, and the voltage change from each pin is monitored. The Arduino calculates which sensor is experiencing the greatest drop in voltage and then sends a signal to the servomotor that turns the skull to face the person.

Extra points awarded for draping black velvet cloth in vein with the Halloween spirit as seen above.
Make certain to space out the photoresistors and extend them from the breadboard using an extension wire attached to each lead. This allows the sensors to be extended to an ideal position in order to track the change in light caused by movement. Consider placing them under the base upon which the skull is mounted, under a bookshelf, or whatever. The base holding the skull and Arduino is easily concealed with some sort of cloth. Once all the wiring is complete, the necessary code can simply be uploaded onto the Arduino, but modifications may be required for few individual parameters depending on proximity of the skull in relation to passersby. The system can be powered with a 5-Vdc adapter or a USB interfacing with a laptop. Visit Instructables for the complete tutorial along with the required Arduino code.
Do you have long running DIY Halloween pranks in your family? Visit TechXchange and share your best ideas.
Advertisement
Learn more about Digi-Key


