![]() Do you spontaneously lose connection to your Wi-Fi home network? Are you fed up with having your favorite Netflix shows or online gaming sessions periodically interrupted? Rickety and fickle Wi-Fi is an inconvenience that many folks unfairly endure for fear of dabbling with forces seemingly too complex to comprehend. But the truth is, optimizing your Wi-Fi network is easy as following any other set of instructions. The tips below will help you maximize your wireless network speed when an Ethernet cable connection is not an option.
Do you spontaneously lose connection to your Wi-Fi home network? Are you fed up with having your favorite Netflix shows or online gaming sessions periodically interrupted? Rickety and fickle Wi-Fi is an inconvenience that many folks unfairly endure for fear of dabbling with forces seemingly too complex to comprehend. But the truth is, optimizing your Wi-Fi network is easy as following any other set of instructions. The tips below will help you maximize your wireless network speed when an Ethernet cable connection is not an option.
1. Use the latest drivers
Verify that the wireless router is running the latest firmware. This is not my favorite tip — it’s the defacto solution suggested by customer reps who’ve no idea what they’re talking about — but there are instances where the vanilla firmware lacks certain optimization functions or cannot take advantage of x64 architecture. A small step, I know, but it’s so easy to do, you have no reason not to. This can be usually be accomplished by clicking the “Firmware Update” section of the router’s admin page, accessed by typing in your IP address into the browser’s navigation bar.
2. Upgrade the Wi-Fi hardware
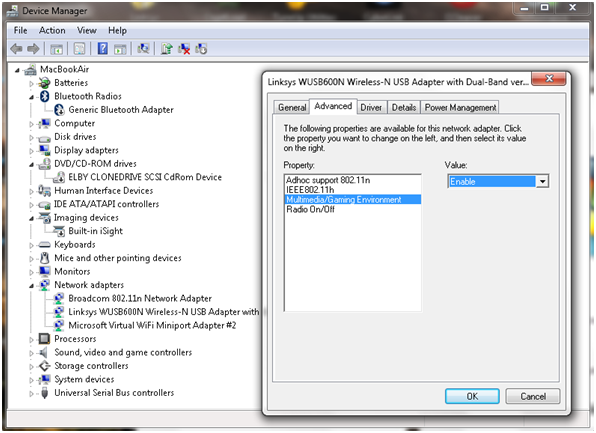
Check under your PC/Laptop’s device manager to see what wireless standard is supported by the Wi-Fi adapter. Computer -> Properties -> Device manager -> Network Adapters. 802.11ac is the most modern standard capable of supporting up to 1 GBps, it’s about twice as fast as its “n” predecessor. The ac standard will have eventually replaced the older 802.11a/b/g/n networks. If your Wi-Fi adapter or router are below ac, upgrading is highly recommended.
3. Change the Wi-Fi Channel
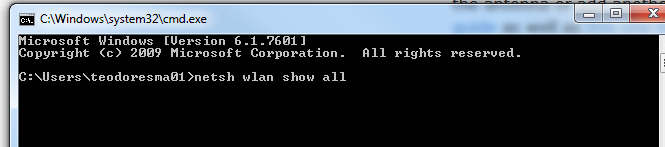
There are multiple channels through which the router communicates with your PC and laptop, but if everyone in the surrounding area has their router set to communicate on the same channel, then network speed may be reduced. To see what channels the surrounding Wi-Fi networks communicate on, simply click start on your Windows toolbar, then type “cmd” in the search bar to find and launch the command line (cmd.exe). Next, type “netsh wlan show all” as shone below.
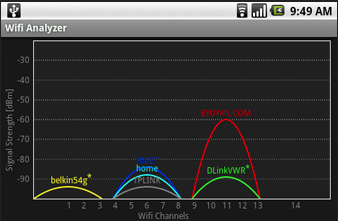
The prompt will then return a large list of all the networks in your area. Scroll through, and take note of the number of networks whose channels overlap with yours. Alternatively, you may use the Wi-Fi Analyzer tool instead of the built-in Windows solution to graph this data, creating an easier to understand visual representation.
Make note of the least saturated channels, as you’ll be swapping to one of them using the instructions below. Depending on the age of your router, it’ll either transmit on the 2.4GHz wavelength band or the 5GHz band if it uses the 802.11ac standard.
To change the channel, type in your IP address into the browser as previously mentioned. (Search “IP address” on Google if you’re unsure what it is, or type “ipconfig” into Window’s Command Prompt). Now that the router’s configuration window has been opened, navigate to the “Wireless tab,” and sort through the settings until you’re presented with a screen that looks like this:
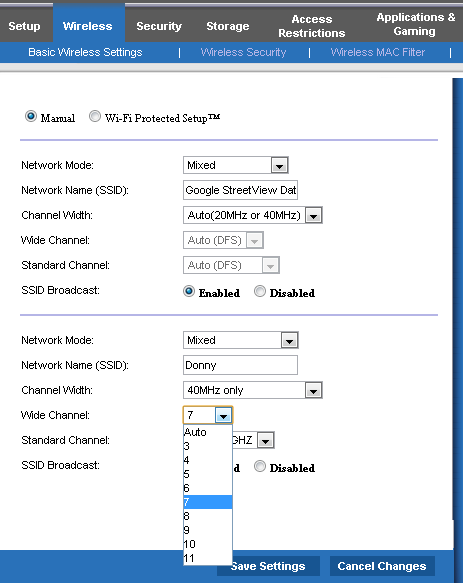
Click “Wide Channel” and select the least used channels in your area. Reconnect your devices and reap the benefits.
4. Additional router settings – 5GHz
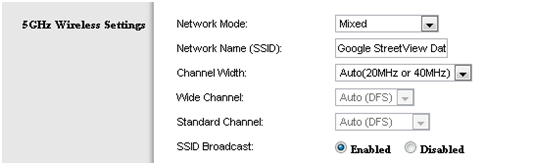
If your adapter and router support “Dual-band” frequency, ensure that you have enabled the 5GHz wireless mode under the wireless settings; this may give you better throughput since 2.4GHz is more likely to be highly inundated with not only other people’s Wi-Fi networks, but with the surrounding Bluetooth headsets, cordless phones, and baby monitors as well. Because there’s a finite amount of spectrum, and most of these devices compete for the same spectrum, there’s often interference and reduced bandwidth.
5. Additional router settings – RTS Threshold
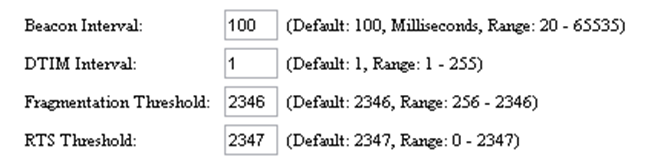
RTS, an IT acronym for “request to send,” and is sent by the client to the access point in order to ask for permission to send the next data packet. Lowering this value improves the Wi-Fi network’s stability as it increases the frequency of how often these checks are made. By contrast, raising this value decrease the frequency of checks. If your network is stable, raising the RTS Threshold to the maximum allowed should contribute toward increasing the performance of your overall connection.
This can be accomplished by looking up the “RTS Threshold value” in the router’s wireless settings, and changing the value to 2347. If connect drops begin occurring, then lower this value.
6. Additional router settings – fragmentation threshold
Fragmentation threshold determines the size of the data packet that a client can send: smaller packets improve reliability at the cost of performance and larger packets perform the opposite. If your connection is reliable, then you may extend this threshold to its maximum value of 2346.
7. Enable multimedia/gaming settings
If this setting is available on your wireless adapter, enabling it will prioritize data packets related to video streaming or online gaming. Meaning, Netflix data packets will receive more bandwidth.
8. Set up a Wi-Fi repeater
For people inhabiting multistory homes or homes with thick walls, one wireless router may not be enough to service the entire household. If this is the case, then a wireless repeater may be your best bet. Resembling the wireless router, the repeater acts as a relay for the Wi-Fi signal, picking it up and rebroadcasting it with renewed strength. The device connects to the wireless router as a regular client, and obtains an IP address over DHCP (dynamic host configuration protocol) just like a PC or laptop.
Sometimes electronics manufacturers will designate these devices as “range extenders” or “Wi-Fi expanders,” but they’re essentially the same thing. The main thing to be aware of is to purchase one that rebroadcasts the same standard as your router, meaning, if the router transmits in 802.11n, ensure the repeater does the same.
9. Antenna
Regardless of how optimized the wireless router’s settings may be, poor positioning and inferior antennas will compromise Wi-Fi signal strength. First, understand that the wireless router’s default antennas is omni-directional, equally wafting signal in all directions. Not only will the adjacent walls, doors, furniture, mirrors, and windows cause interference and signal degradation, but additional signal strength is wasted when channeled in directions opposite from any adapters that may receive it. Depending on the location of your computer/laptop, funneling the signal in their direction may be worthwhile.
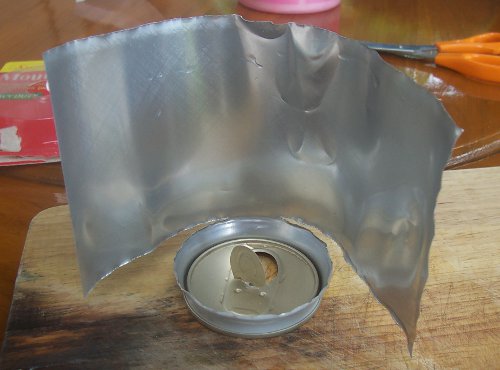
This can be accomplished by either replacing the omni-directional antenna with a directional one, or by building your own with a beer or soda. Simply empty the contents of the can, clean it, and remove the bottom of the can using a box cutter or knife. Next, cut around the top of the can, leaving only an inch attached to the body. Once this is finished, cut the can lengthwise and pull apart the aluminum to create something resembling a radar dish. Finally, flip the device upside, and slide the antenna through the mouth piece. You’ve just created a reflector to concentrate the Wi-Fi signal in any direction you choose.
If this does did not boost your signal, then consider purchasing an aftermarket antenna as the fault may lie with a low-quality default antenna.
10. Benchmark and diagnose your Wi-Fi
Now that we have done all we could to optimize our Wi-Fi network, it’s time to benchmark it using a free tool called QCheck. Entering your IP address in the tab marked “Endpoint 1” and another IP address in your network under “Endpoint 2,” will test the speed; the router’s IP address plus that of your computer/laptop will suffice. The test will provide additional information informing you of any bottlenecks.
Advertisement
Learn more about Electronic Products Magazine


