
With the division between virtual life and meat space growing increasingly blurred, optimized cybersecurity should not be treated as a prerogative of the computer-savvy, but as an imperative of the masses. We’ve already covered secure browsing as well as how to speed up computers, so naturally, the next evolution of coverage jumps into encryption. Today, we’ll discuss how to encrypt your PC, Mac, phone, and tablet in a series of simple steps.
To quickly navigate through this lengthy guide and jump to the most relevant section, hit control + F and type “Windows, Mac OS, Android, or iPhone/iPad” into your browser’s search box.
Why is this something you shouldn’t be hard-pressed to avoid? Simply put, mobile devices and computer are windows into our lives, and as such, must be treated with the utmost highest security. A single breach can usher a cascading effect that leaves all your accounts open, all it takes a stored email or browser password. Devices secured with little more than a four to six digit password, or a fingerprint, stop thieves from accessing the device directly through the frontend GUI, but they won’t prevent access from the backend. Encryption resolves this by scrambling backend data and adding another layer of defense requiring the input of another password.
Once your device is encrypted, almost no one can access the data within so long as you maintain a strong password.
Windows
These days, the majority of Windows 10 PCs (and Microsoft tablets and hybrids) have encryption enabled by default. To verify if encryption is already running, open up Settings and click System > About. If nothing related to “Device Encryption” is displayed, then the feature may not be supported by your device. Fortunately, the Ultimate and Enterprise edition of Windows 7, and the Pro edition of 8, and 10 contain a feature called BitLocker that offers the same function.
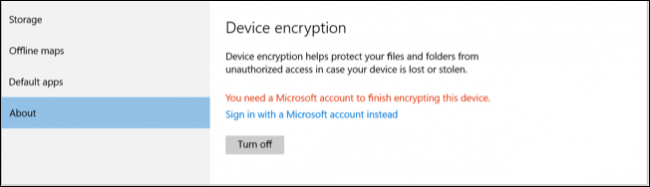
(Users in possession of the Home edition of Windows do not have access to BitLocker, and will have to use third-party software like VerCrypt if the “Device Encryption” feature is also inaccessible). If BitLocker is turned off, proceed below.
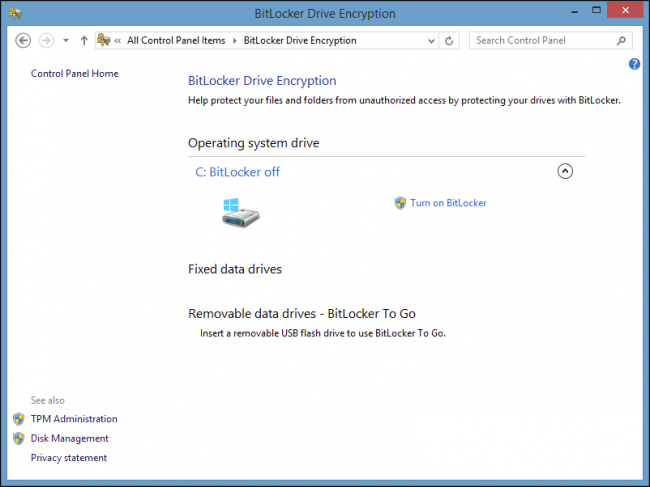
Step 1: Enable BitLocker
Open up the Control Panel and navigate to System and Security > BitLocker Drive Encryption. Alternatively, you can right-click a storage drive and select “Turn on BitLocker.” Two types of BitLocker encryption features will be available here. The first, “BitLocker Drive Encryption,” is default setting needed to encrypt an entire drive—that’s what we want. BitLocker To Go, the second setting, is used to encrypt removable devices like USB flash drives and external hard drives.
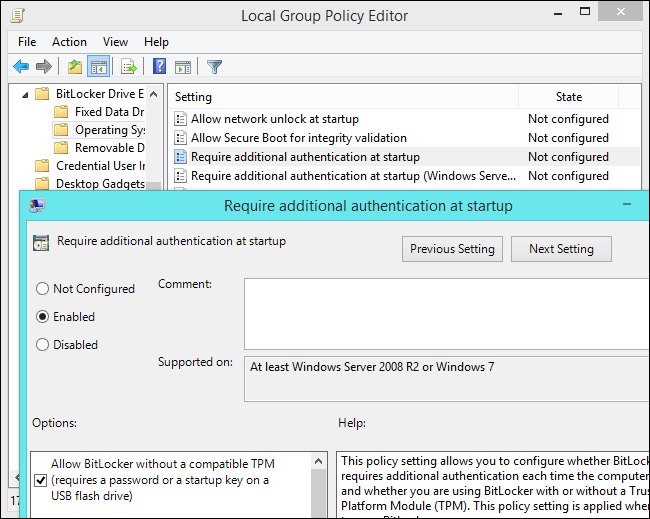
Step 2: Use BitLocker without a TPM (Trusted Platform Module)
The BitLocker Drive Encryption typically stores the encryption key on a hardware component attached to the motherboard called the Trusted Platform Module (TPM). If your computer does not have a TPM, then you’ll have to open the Local Group Policy Editor application and manually overwrite the setting, storing the key on the data drive. Next, press the Windows Key + R to run the dialog, then type gpedt.msc into it and press enter. Navigate to Computer Configuration > Administrative Templates> Windows Components> BitLocker Drive Encryption> Operating System Drives. Lastly, double-click the “Require additional authentication at startup” setting and select “Enabled” and “Allow BitLocker without a compatible TPM,” then hit “save.”
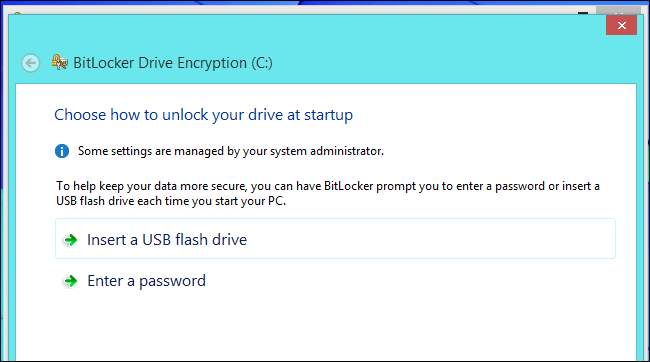
Step 3: Choose an unlock method
Once BitLock is enabled, proceed to the “Choose how to unlock your drive at startup” screen. Here you can select from one of the several ways of unlocking, either using a password or by inserting a USB flash drive containing the key. If you select the latter option, then simply follow the instructions to copy the key onto the USB; ensure you’ve created duplicate USBs to prevent a permanent lockout in case one gets lost.
If your computer possesses a TPM—as most contemporary motherboards do—then you have the additional of encrypting at startup by pulling the key from the chip. Alternatively, you may also set up a PIN to unlock the decryption key from the TPM at startup
Once you’ve selected your preferred option, proceed to next screen and follow the instructions for setting up a recovery key.
Step 4: Create and then back up the recovery key
Don’t forget to set up a recovery key, as enables you to salvage encrypted data should the main key get lost or become inaccessible — either because you forgot the password or the computer housing the TPM is destroyed.
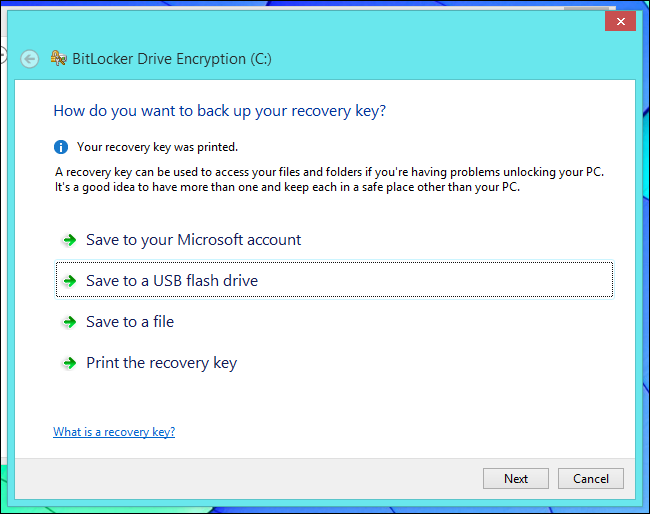
Once completed, print you key, store it on a separate USB drive, save it to a file, save it to your Microsoft account on Windows 8 and 8.1, or whatever you need to do to ensure it stays safe. Lose it, and you will permanently lose your data. Access keys stored on the Microsoft account through https://onedrive.live.com/recoverykey.
That’s it for Windows!
Mac OS X
Mac users rejoice: encrypting Macs is even easier and less fussy than encrypting Windows machine, as Apple provides all Macs with FileVault, its built-in encryption feature. As a bonus, you can grant multiple users accounts the ability to unlock your disk by inputting a password upon startup.
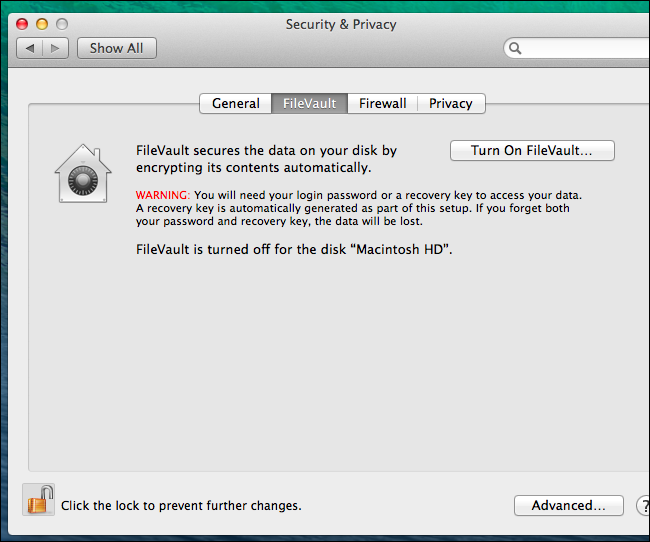
Step 1: Verify if FileVault is enabled, and enable if needed
The FileVault encryption featured is typically enabled by default. To verify, click the Apple icon on the menu at the top of your screen and proceed to the System Preferences, next open “Security & Privacy,” select the FileVault tab and click on “Turn on FileVault” to enable and configure its functions.
Step 2: Set up a recovery key
Don’t forget to create a recovery key. You’ll need it to access the drive should you forget the password. Once the key is backed up, reboot the Mac to begin the encryption process.

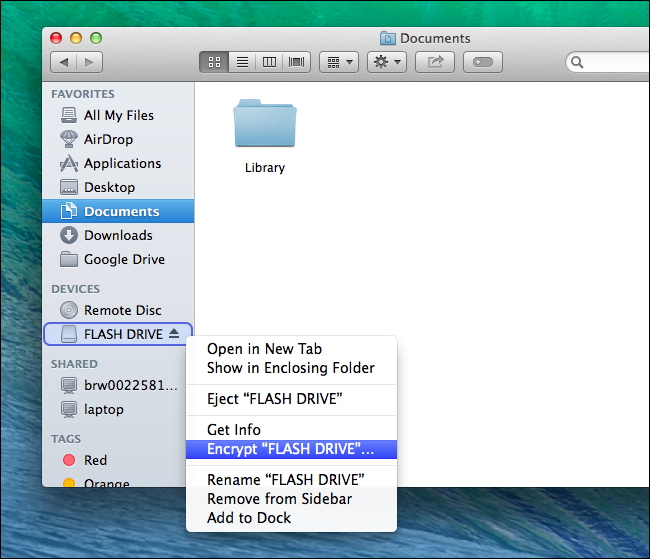
Step 3: Encrypt removable drives
To encrypt an external storage drive or flash drive, connect the device to the Mac and open the Finder. Contrl+click or right-click the drive listed in the Finder’s sidebar, and select the option labeled Encrypt “Drive’s Name.” Once more, you’ll be prompted to create a password before encryption can take place.
Android phones & tablets
Encryption is enabled out-of-the-box in nearly every device running anything newer than the Lollipop (5.x) operating system. If this happens to be the case with your phone, then there’s no way to disable it; but if you’re using a device that’s not already encrypted, simply access the device settings and tap the “Security”, find the encrypt option, and enable it.
Bear in mind that encryption is a one-way street for Android phones. Once encrypted, there’s no way to undo the process besides factory resetting the device and losing all the data. What’s more, encrypted data decrypts in real-time so that older model phones may experience a slight decrease in responsiveness and performance.
Step 1: Prepare the phone for encryption
It takes about an hour to encrypt the device from start to finish, so make sure you’ve allotted enough time. Prematurely ending the process will delete all your data . Secondly, the phone’s battery must be charged to at least 80% capacity and plugged in. Otherwise, the process cannot begin. If the phone is rooted, you’ll also have to unroot it before continuing.
Step 2: Access the Security settings
As previously mentioned, access the Settings menu and head to the “Security” tab; the exact wording might differ across devices, but the UI should be similar. Click the “Encrypt phone” option to initiate the process if the on-board storage is not already encrypted.

Note: Default encryption solely applies to onboard storage. SD cards must be manually encrypted. Phones that support SD card encryption will display the option under the security tab.
Step 3: Read through warning and confirm
Multiple warnings will pop up highlighting what to expect once the process is complete. We’ve already discussed this in detail. Confirm and initiate to process. The phone will reboot once finished
Step 4: Set up a PIN or Password
If you have not already set up a PIN or password, do it now. Access the device’s Settings > Security menu, followed by the “Screen Lock” option. Choose your favorite option, and that’s it! Your device is encrypted henceforth!

Apple iPhones & iPads
The probability of your iPhone or iPad not being encrypted is even lower, as encryption has become automatic since the release of iOS 8 in 2014. Older devices are the obvious exceptions to the rule, but given Apple’s built-in obsolescence, the probability of any of these devices remaining in use is rather low.
Data encryption on the iOS is linked to your passcode, so increase security by selecting a 6-digit passcode versus the weaker 4-digit variant; further improve the security by including an arbitrary length alphanumeric key.
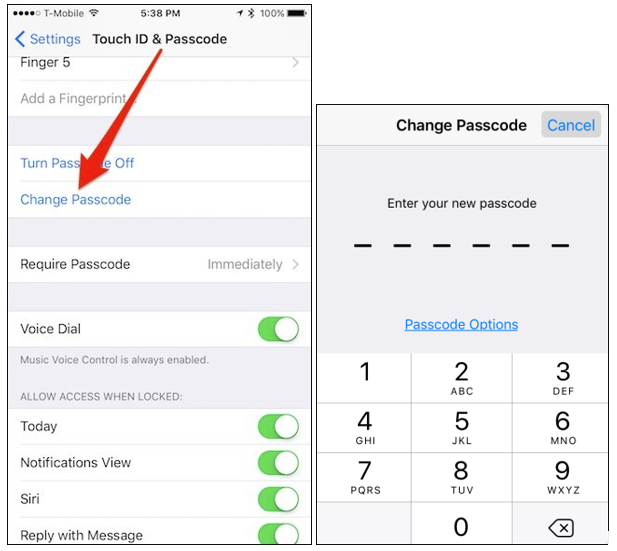
Step 1: Enable 6-digit passwords
If you’re still on the 4-digit passcode train, hop into the device settings, then tap “Touch ID & Passcode,” followed by “Change Passcode.” Confirm your old passcode, then input a new 6-digit one. Tap “Passcode Options” to include alphanumeric keys.
Step 2: Verify that your device is encrypted
It can’t hurt to confirm whether or not encryption is enabled from the onset. To do so, head back to the “Touch & Passcode” settings and scroll to the bottom where it’ll state “Data protection is enabled” if encryption is enabled. That’s it.
Careful as you may be, you can’t always hedge against random events like burglaries or random spurts of amnesia. Make your life easier and grant yourself peace of mind — especially when traveling — by encrypting your phone, laptop, and tablet.
Advertisement
Learn more about Electronic Products Magazine


