By T.K. Hareendran, contributing writer
In Part One of this review, I showed how to get the OS installed and set up. From there, it’s easy to follow one of the “getting started” examples to get the “Hello World” program running. Here, I look at some of the options you have for manipulating the hardware resources in preparation for actual project development.
One of the nice features of the MinnowBoard Turbot is the wide assortment of operating systems that can be used with it. These include Ubuntu (16.04.1 LTS), as well as both Android and Windows (8.1/10/IoT Core). My personal preference for development purposes is usually Ubuntu. Its base installation is much more lightweight than Windows, but nevertheless, Ubuntu offers a huge pick of software packages that can easily be downloaded over the network and then installed.
Update & upgrade
First, I should also point out that, to the best of my knowledge, the customized material contained within this article is correct. I make no guarantees, however. I also take no responsibility for any damage that you may do based upon knowledge and skills gained from using this material.
That said, let’s get started.
When working with any OS, it’s a good idea to always keep the software up to date. Installed packages can be updated automatically over the network, which is a very useful and worthy feature, especially in the case of security-concerned updates. While the MinnowBoard Turbot is running and connected to a network, it will occasionally check for updates and let you know to install them.
Because you may not keep your SBC on all the time, though, as you would for a traditional computer, you should know how to update the system by hand via the command line interface. This will ensure that you have the latest software and security patches to work with.
To update the MinnowBoard under Ubuntu manually, navigate the user interface to launch the terminal program by pressing ALT-F1 and then ENTER to start the “Search your computer” application. Type “terminal” and press enter to launch the terminal application.
Once the terminal is launched, update the operating system by using these commands (and keep your password handy):
sudo apt-get -y update
sudo apt-get -y dist-upgrade
Be patient. This first update process can take a long time, depending on your network speed and the number of software upgrades that need to be installed. When the update is finally done, reboot the system to ensure that you are running with all the latest software by executing the command sudo reboot .
Hello, blink!
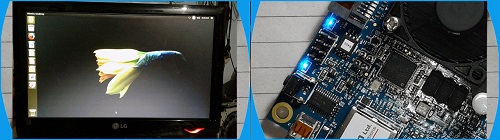
Now that the OS is up to date, it’s time to start learning how to manipulate the IO ports on the board. As a place to start, there are two blue LEDs on the MinnowBoard Turbot to indicate the power status of the board. You can control the second LED (D2) from the OS once the system is running, handling it via the standard GPIO interfaces.
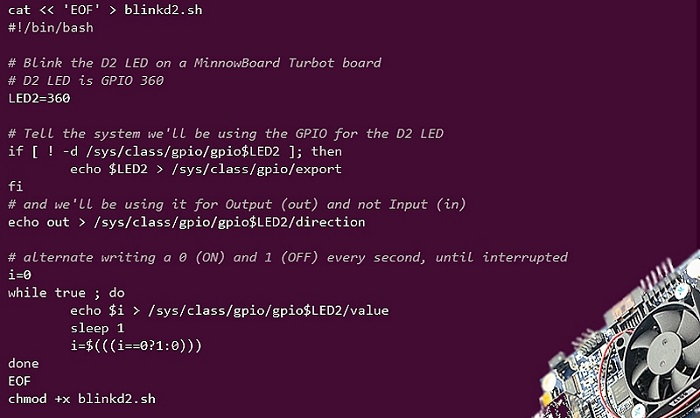
In principle, the simplest method to interface with the Linux GPIO interfaces is through the file system, and you can give the following a try on your MinnowBoard Turbot: Within a terminal window, create a file blinkd2.sh containing the script shown below, then run the script with the sudo command: sudo bash blinkd2.sh .
That’s it. This short bash command line script will toggle the LED(D2) at 1 cps. Note that you can press CTRL-C to stop the script from running.
Bash scripting does rely on an understanding of the Linux Command Line, however. If you are not confident with the Linux Command Line, I suggest that you start learning it by going through some Linux Tutorials.
If Windows is more familiar to you, you can use the Windows IoT core with the MinnowBoard just as readily as Ubuntu. In fact, I decided to switch to Windows IoT for these next steps. The MinnowBoard is the first SBC I have had that could run Windows IoT core, and I wanted to utilize this rare opportunity.
Blinky Windows!
The special IoT Core version of Microsoft’s Windows lets you get up and running fast. If you follow this tutorial and get set up to run your MinnowBoard Turbot as a Windows 10 IoT Core system, then it’s not difficult to create an LED blinking app and connect an external (low-current type) LED to the MinnowBoard Turbot.
You can find the source code of an LED experiment by downloading the relevant zip file and navigating to samples-developBlinky (available either in C++ or C#). Make a copy of the folder on your disk and open the project from Visual Studio 2017. This is a great way to make sure that everything is working and easily play with your board. Fortunately, most quick-run samples are pre-built and require no cumbersome compiling or coding to get going.
Shown below is the hardware configuration for the experiment. Just be aware that the GPIO APIs are only for Windows 10 IoT Core, not for desktop systems.
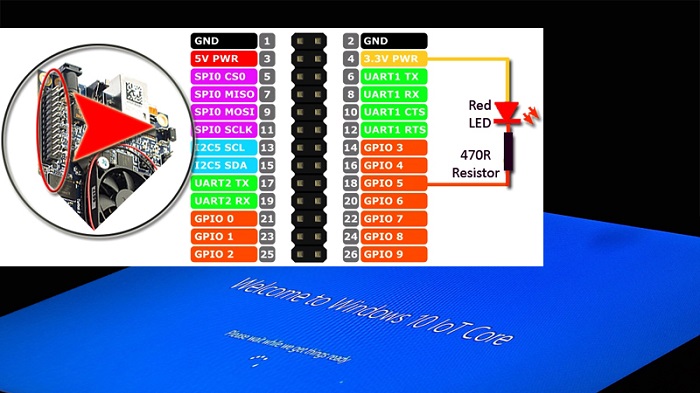
For further details, refer to this link.
The Serial UART
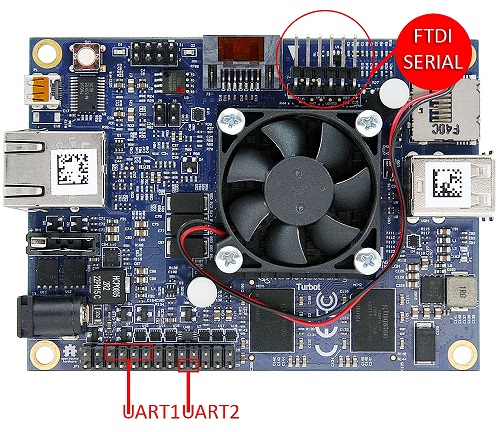
Once you are able to manipulate GPIO ports successfully, a next step might be to work with the UART (Universal Asynchronous Receiver/Transmitter). These peripherals are a key component in the serial communications subsystem of a computer and are also a common feature integrated in most microcontrollers. Fortuitously, MinnowBoard has two onboard high-speed serial UARTs, available via the Low Speed Expansion header. There are UART1 at GPIO pins 6, 8, 10, and 12 and UART2 at GPIO pins 17 and 19. There’s also the serial console port (UART0) on pin 6 of the FTDI connector next to the SATA connector, but that’s the debug UART, so you probably should avoid messing with it during development. All three connections are shown below.
One possible use of the serial interface could be to establish communication between your MinnowBoard and an IoT device. To make the serial connection, you have two options: The first is using the onboard UART controller, and the second is to use USB via a USB/TTL adapter.
If you’re going to use the UART2, you can connect the Tx wire (green) of a USB-TTL cable to the Rx pin (pin 19), the Rx wire (white) to the Tx pin (pin 17), and the GND wire (black) to GND (pin 1) on the board. Just leave the power wire (red) of the USB-TTL cable unconnected.
For the USB-to-TTL-adapter approach, you will need a Silicon Labs CP2102-based USB-to-TTL adapter because it’s the one natively supported by MinnowBoard. When connecting the adapter, always try the MinnowBoard’s bottom USB port.
Once you have your serial interface set up, get ready to create a simple app for communication over the serial interface. Here are the “Windows” links for a “headed” sample (Windows 10 IoT Core can be configured for either headed or headless mode to get you started):
Setup instructions for changing modes
Sample application instructions
Code files
Next steps
I’ve been spending considerable time and effort on creating a working project using the MinnowBoard, though it’s not ready yet. You’ll need to be patient to see the results. I’m preparing a third part to this review, to be published here after a short break. In the meantime, I will be reviewing other development tools and boards.
Want more? Here are some of TK’s other hands-on reviews:
Hands-on review: Open-source MinnowBoard Turbot SBC is fast, powerful, and versatile
Hands-on review: Analyze signals with free, open-source sigrok PulseView
Hands-on review: Plug-and-play your way to the IoT with Wio Link
Hands-on review: Sparky single-board computer for media, VoIP, and standalone computing
Advertisement
Learn more about Electronic Products Magazine


