By T.K. Hareendran, contributing writer
The ESP8266 is a wonderful Wi-Fi SoC that I have experimented with several times, playing with various boards and modules. Recently, I found a new ESP8266 toy: the Wi-Fi Witty, which currently sells for around $6 on ICStation. You just need a proper USB cable and a suitable compiler to start programming the Wi-Fi transceiver, which is a complete solution for home automation and IoT projects.
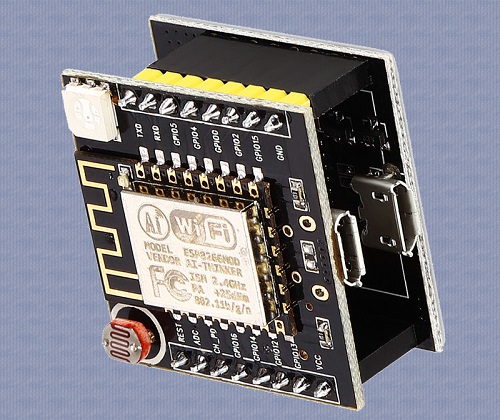
Surprisingly, the Wi-Fi Witty module, produced by GizWits and based on an ESP-12F, offers plenty of hardware to play with. The compact module is available as a stack of two populated circuit boards that come with an onboard 5-mm light-dependent resistor (LDR, aka photoresistor), RGB chip LED, 3x tactile buttons, and a CH340G Micro-USB interface.
First look
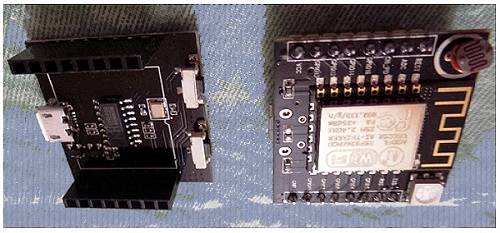
For my first look, I tore down the Wi-Fi Witty to do a hardware analysis. The module reveals a simple but clever design that uses two stacked PCBs to reduce the form factor. The lower board holds a CH340G USB-TTL converter, two tactile buttons (Flash and Reset), and a micro-USB socket; the upper board carries the ESP12-F, the RGB LED, and the LDR on its top layer and an LM1117 (3.3-V) voltage regulator, another micro-USB socket, and one tactile button on its bottom layer.

It seems that the upper board can operate standalone; i.e., without the lower board. Although the module can be powered from either USB socket, only the lower board’s socket provides a USB-TTL interface. The upper board is basically just the breakout.
The lower board works as a nitty-gritty programmer. I suppose that this allows us to flash the firmware for the upper board, then pry it off the lower board and use it independently. Thereafter, we can even send newer firmware versions to it over the air (OTA). A nice benefit of this structure is that we can use the lower board as the programmer for numerous similar breakout boards.

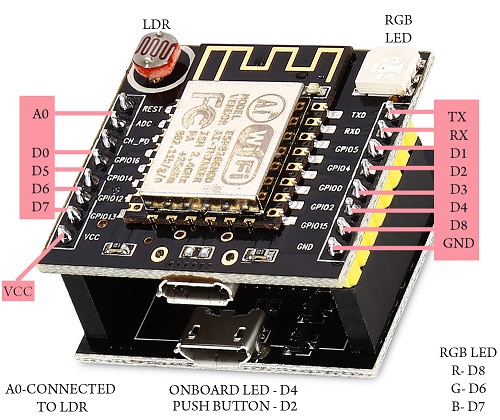
Unfortunately, it’s not easy to find official documentation for the Wi-Fi Witty, so I created my own. My hardware analysis revealed that the RGB LED channels are linked to GPIO15/12/13, which is equivalent to D8/6/7 in Arduino IDE. The onboard LED connects to GPIO2/D4. Similarly, the LDR connects with the ADC/A0 pin. I put together the following image to serve as a useful reference.

Quick run
After exploring the hardware layout, I went to try out the module. When I first powered it up, the RGB-LED showed only a steady green light. The LDR seemed to have no impact on that. The module connected to Wi-Fi as “Al- THINKER _1428E4.”
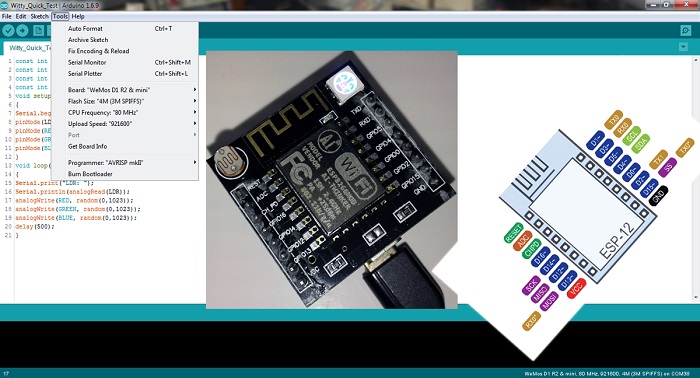
Next, I prepared and uploaded my test sketch (after a thorough search for examples) with aid of the Arduino IDE (1.6.9). The sketch sought to read from the LDR and write to the RGB-LED simply to test Witty’s basic functionality. I got it to work, though it was a fairly hard fight for me!
To do something useful will require some additional hardware development, I think. By using the motherboard (upper board) as a standalone IoT module, we can expose the pins connected to the two 1/10-in. eight-pin headers and use them to attach to breadboards. Removing the LDR will free up the ADC channel for other sensors, and offing the RGB-LED gives three more GPIOs for other transducers and the like.
It’s not too difficult to build such a simple system with just a Veroboard and a bunch of standard male/female headers. The IoT setup can then be powered via the USB socket/VCC pin, preferably from something like a “Hi-Link 5V/0.6A” AC/DC adapter (HLK-PM01 3W).

A noteworthy fact here is that the single-channel ADC may be used either to read module supply voltage (VCC) or to read the voltage at the ADC pin (0–1.0 V). However, to read module supply voltage, the ADC pin must be kept unconnected. Also, you need to take extreme care when trying to use other digital I/O pins because those pins can provide a maximum output current of 12 mA only (6 mA suggested).
Epilogue
I should mention that, right now, I’m experimenting with a handful of renowned temperature, humidity, and impact sensors (in addition to Witty’s onboard photoresistor) with the aim of getting this device to register sensor data to the EasyIoT Cloud . I’ll have more on the idea in a future post.
The Internet of Things (IoT) is revolutionizing many industries, and at the heart of it all is a minuscule IoT module that connects virtually anything to wireless radio networks. For novices and makers, it’s better to work with a pre-made IoT module solution rather than designing an IoT device from scratch. The choices for modules can seem daunting at first, though. Fortunately, cheap IoT modules like Wi-Fi Witty featuring plug-and-play connectivity are available to save time and development cost.
For more hands-on reviews by TK, follow these links:
Hands-on review: HM-10 BLE module and its mysterious clones
Hands-on review: When hacking an OBD-II adapter, choose carefully
Hands-on review: ESP32 offers a powerful IoT-enabled MCU for novices and pros alike
Hands-on review: Getting started with the Intel tinyTILE
Hands-on review: Open-source MinnowBoard Turbot SBC is fast, powerful, and versatile
Advertisement
Learn more about Electronic Products Magazine


